Hacking uBuntu to Improve Performance

Wednesday, April 13, 2011

Tunning Kernel Parameters

Many of the tunable performance items can be configured directly by the kernel. The command sysctl is used to view current kernel settings and adjust them. For example, to display all available parameters (in a sorted list), use:

sudo sysctl -a | sort | more

Note: There are a few tunable parameters that can only be accessed by root. Without sudo, you can still view most of the kernel parameters.

Each of the kernel parameters are in a field = value format. For example, the parameter kernel.threads-max = 16379 sets the maximum number of concurrent processes to 16,379. This is smaller than the maximum number of unique PIDs (65,536). Lowering the number of PIDs can improve performance on systems with slow CPUs or little RAM since it reduces the number of simultaneous tasks. On high-performance computers with dual processors, this value can be large. As an example, my 350 MHz iMac is set to 2,048, my dual-processor 200 MHz PC is set to 1024, and my 2.8 GHz dual processor PC is set to 16,379.

Tip: The kernel configures the default number of threads based on the available resources. Installing the same Ubuntu version on different hardware may set a different value. If you need an identical system (for testing, critical deployment, or sensitive compatibility), be sure to explicitly set this value.

There are two ways to adjust the kernel parameters. First, you can do it on the command line. For example, sudo sysctl -w kernel.threads-max=16000. This change takes effect immediately but is not permanent; if you reboot, this change will be lost. The other way to make a kernel change is to add the parameter to the /etc/sysctl.conf file. Adding the line kernel.threads-max=16000 will make the change take effect on the next reboot. Usually when tuning, you first use sysctl –w. If you like the change, then you can add it to /etc/sysctl.conf. Using sysctl –w first allows you to test modifications. In the event that everything breaks, you can always reboot to recover before committing the changes to /etc/sysctl.conf.


Computing Swap

The biggest improvement you can make to any computer runnning Ubuntu is to add RAM. In general, the speed impact from adding RAM is bigger than the impact from a faster processor. For example, increasing the RAM from 128 MB to 256 MB can turn the installation from a day job to an hour. Increasing to 1 GB of RAM shrinks the installation to minutes.

There is an old rule-of-thumb about the amount of swap space. The conventional wisdom says that you should have twice as much swap as RAM. A computer with 256 MB of RAM should start with 512 MB of swap. Although this is a good idea for memory limited systems, it isn't practical for high-end home user systems. If you have 1 GB of RAM, then you probably will never need swap space—and you are very unlikely to need 2 GB of swap unless you are planning on doing video editing or audio composition.

There is a limit to the amount of usable RAM. A 32-bit PC architecture like the Intel Pentium i686 family can only access 4 GB of RAM. This is a hardware limitation. Assuming you can insert 16 GB of RAM into the computer, only the first 4 GB will be addressable. The second limitation comes from the Linux 2.6 kernel used by Ubuntu's Dapper Drake (as well as other Linux variants). The kernel can only access 1 GB of RAM. Any remaining RAM is unused. For this reason, it is currently not worth investing in more than 1 GB of RAM. Also, since the total virtual memory (RAM + swap) is limited to 4 GB, you should not need to allocate more than 3 GB of swap on a 1 GB RAM system.

Note: If you compile the kernel from scratch, there is a HIGHMEM flag that can be set to access up to 4 GB of RAM on a 32-bit architecture. Unfortunately, there is a reported performance hit since most hardware drivers cannot access the high memory. If you set this flag, then do not bother with any swap space—the total amount of memory (RAM + swap) cannot be larger than 4 GB.


Modifying Shared Memory

Some sections of virtual memory can be earmarked for use by multiple applications. Shared memory allows different programs to communicate quickly and share large volumes of information. Applications such as X-Windows, the Gnome Desktop, Nautilus, X-session manager, Gnome Panel, Trashcan applet, and Firefox all use shared memory. If programs cannot allocate or access the shared memory that they need, then programs will fail to start.

The inter-process communication status command, ipcs, displays the current shared memory allocations as well as the PIDs that created and last accessed the memory.

Tip: There are many other flags for ipcs. For example, ipcs -m –t shows the last time the shared memory was accessed, and ipcs -m –c shows access permissions. In addition, ipcs can show semaphore and message queue allocations.

Programs can allocate shared memory in two different ways: temporary and permanent. A temporary allocation means the memory remains shared until all applications release the memory handle. When no applications remain attached (the ipcs nattch field), the memory is freed. In contrast, permanent allocations can remain even when no programs are currently using it. This allows programs to save state in a shared communication buffer.

Sometimes shared memory becomes abandoned. To forcefully free abandoned memory, use ipcrm. You will need to specify the shared memory ID found from using ipcs (the shmid column).

More often than not, you will be more concerned with allocating more shared memory rather than freeing abandoned segments. For example, databases and high-performance web servers work better when there is more shared memory available. The sysctl command shows the current shared memory allocations:

$ sysctl kernel | grep shm
kernel.shmmni = 4096
kernel.shmall = 2097152
kernel.shmmax = 33554432

In this example, there is a total of 33,554,432 bytes (32 MB) of shared memory available. A single application can allocate up to 2 MB (2,097,152 bytes), and the minimal allocation unit is 4096 bytes. These sizes are plenty for most day-to-day usage, but if you plan to run a database such as Oracle, MySQL, or PostgreSQL, then you will almost certainly need to increase these values.


Changing Per User Settings

Beyond the kernel settings are parameters for configuring users. The ulimit command is built into the bash shell and provides limits for specific application. Running ulimit –a shows the current settings.

These setting show, for example, that a single user-shell can have a maximum of 1,024 open files and core dumps are disabled (size 0). Developers will probably want to enable core dumps, with ulimit -c 100 (for 100 blocks). If you want to increase the number of open files to 2,048, use ulimit -n 2048.

The user cannot change some limits. For example, if you want to increase the number of open files to 2,048 then you would use ulimit -n 2048, except only root can increase this value. In contrast, the user can always lower the value.

Note: Some values have an upper limit defined by the kernel. For example, although root can increase the number of open file handles, this cannot be increased beyond the value set by the kernel parameter fs.file-max (sysctl fs.file-max).

On a multi-user system, the administrator may want to limit the number of processes any single user can have running. This can be done by adding a ulimit statement to the /etc/bash.bashrc script:

# Only change the maximum number of processes for users, not root.
if [ `/usr/bin/id -u` -ne 0 ] ; then

ulimit -u 2048 2>/dev/null # ignore errors if user set it lower
else
ulimit -u unlimited # root can run anything

fi


Speeding Up Boot Time

The default init scripts found in /etc/init.d/ and the /etc/rc*.d/ directories are good for most systems, but they may not be needed on your specific system. If you do not need a service then you can disable it. This can reduce the boot time for your system. In some cases, it can also speed up the overall running speed by freeing resources. Use sysv-rc-conf (sudo apt-get install sysv-rc-conf) to change the enable/disable settings. Some of the services to consider disabling include:

anacron—As mentioned earlier, this subsystem periodically runs processes. You may want to disable it and move any critical services to cron.

atd and cron—By default, there are not at or cron jobs scheduled. If you do not need these services, then they can be disabled. Personally, I would always leave them enabled since they take relatively few resources.

apmd—This service handles power management and is intended for older systems that do not support the ACPI interface. It only monitors the battery. If you have a newer laptop (or are not using a laptop), then you probably do not need this service enabled.

acpid—The acpid service monitors battery levels and special laptop buttons such as screen brightness, volume control, and wireless on/off. Although intended for laptops, it can also support some desktop computers that use special keys on the keyboard (for example, a www button to start the browser). If you are not using a laptop and do not have special buttons on your keyboard, then you probably do not need this service.

bluez-utiles—This provides support for BlueTooth devices. If you don't have any, then this can be disabled.

dns-clean, ppp, and pppd-dns—These services are used for dynamic, dial-up connections. If you do not use dialup, then these can be disabled.

hdparm—This system is used to tune disk drive performance. It is not essential and, unless configured, does not do anything. The configuration file is /etc/hdparm.conf and it is not enabled by default.

hplip—This provides Linux support for the HP Linux Image and Printing system. If you do not need it, then it can be disabled. Without this, you can still print using the lpr and CUPS systems.

mdadm, mdadm-raid, and lvm—file system support for RAID (mdadm and mdadm-raid) and Logical Volume groups (lvm). If you do not use either, then these can be disabled.

nfs-common, nfs-kernel-server, and portmap—reused by NFS—present if you installed NFS support. If you do not need NFS all the time, then you can disable these and only start the services when you need them:

sudo /etc/init.d/portmap start
sudo /etc/init.d/nfs-common start
sudo /etc/init.d/nfs-kernel-server start

pcmcia and pcmciautils—provide support for PCMCIA devices on laptops. If you do not have any PCMCIA slots on your computer, then you do not need these services.

powernowd and powernowd.early—services are used to control variable-speed CPUs. Newer computers and laptops should have these enabled, but older systems (for example, my dual-processor 200 MHz PC) do not need it.

readahead and readahead-desktop—services are used to preload libraries so some applications will initially start faster. In a tradeoff for speed, these services slow down the initial boot time of the system and consume virtual memory with preloaded libraries. If you have limited RAM, then you should consider disabling these services.

rsync— a replacement for the remote copy (rcp) command. Few people need this—sed to synchronize files between computers.

vbesave—services monitors the Video BIOS real-time configuration. This is an ACPI function and is usually used on laptops when switching between the laptop display and an external display. If your computer does not support APCI or does not switch between displays, then you do not need this service.


Tip: There is a System>Admin>Services applet for enabling and disabling some services. However, this applet only knows of a few services; it does not list every available service. The sysv-rc-conf command recognizes far more services and offers more management options.

The sysv-rc-conf command shows most of the system services. However, it does not show all of them. If the service's name ends with .sh, contains .dpkg-, or is named rc or rcS, then it is treated as a non-modifiable system service. To change these services, you will need to manually modify the /etc/init.d/ and /etc/rc*.d/ directory contents.


Leave It On!

Although there are many services that you probably do not need, there are a few that are essential. You should not turn off these essential services unless you really know what you are doing:

dbus—s messaging services.

gdm— the Gnome Desktop. Only disable this if you do not want a graphical desktop.

klogd— the kernel log daemon. Removing it disables system logging.

makedev and udev—create all device nodes.

module-init-tools—kernel modules specified in /etc/modules.

networking and loopback—start and stop the network. Disabling removes the network configuration at boot.

procps.sh—kernel tuning parameters added to /etc/sysctl.conf are processed by this service.

urandom—eds the real random number generator that is used by most cryptographic system. You should leave it enabled.

As a rule of thumb, if you do not know what it is, then leave it on. Also, if the service only runs in single-user mode (rcS) that it is usually smart to not change it. Single user mode is where you should go when everything fails in order to repair the system.


Summary

Ubuntu is designed for the average computer user. As a result, there are some running processes that may not be needed and some resources that are not used optimally. Using a variety of commands, you can see what is running, what resources are available, and what resources are being used. The system can be tuned by adjusting kernel parameters, shell parameters, and settings for specific applications.


AddThis Social Bookmark Button

Binary to Decimal and Decimal to Binary

Sunday, February 20, 2011


Perlu diketahui bahwa binary hanya menggunakan angka 0 dan 1 (bukan 0-9), binary menggunakan "Power of Two".
Berikut ini cara untuk mengubah Binary to Decimal
= untuk setiap digit 1 dalam binary, kalikan dengan 2**n(2 pangkat n), dimana n adalah zero base position

Berikut ini contoh binary 11001010
= 1*2**7 + 1*2**6 + 0*2**5 + 0*2**4 + 1*2**3 + 0*2**2 + 1*2**1 + 0*2**0
= 128 + 64 + 0 + 0 + 8 + 0 + 2 + 0
= 202 (decimal)

Untuk Merubah Decimal ke Binary agak sulit :
Misal 1359 (decimal)
# 2**10=1024 , 2**11=2048. Jadi 1024 adalah bilangan terbesar yang dibawah 1359. Kurangi 1024 dari 1359, dan berikan angka 1 binary di sebelah kiri, sisa 1359-1024 adalah 335, Binary = 1
# 2**9=512 , lebih besar dari 335 , berikan angka 0 pada binary , sisa decimal tetap 335, Binary = 10
# 2**8=256 , lebih kecil dari 335 , decimal 335-256=79 , tambahkan binary dengan 1 , sisa decimal 79 , Binary = 101
# 2**7=128 , lebih besar dari 79 , berikan angka 0 pada binary , sisa decimal tetap 79 , Binary = 1010
# 2**6=64 , lebih kecil dari 79 , decimal 79-64=15 , tambahkan binary dengan 1 , sisa decimal 15 , Binary = 10101
# 2**5=32 , lebih besar dari 15 , berikan angka 0 pada binary , sisa decimal tetap 15 , Binary = 101010
# 2**4=16 , lebih besar dari 15 , berikan angka 0 pada binary , sisa decimal tetap 15 , Binary = 1010100
# 2**3=8 , lebih kecil dari 15 , decimal 15-8=7 , tambahkan binary dengan 1 , sisa decimal 7 , Binary = 10101001
# 2**2=4 , lebih kecil dari 7 , decimal 7-4=3 , tambahkan binary dengan 1 , sisa decimal 3 , Binary = 101010011
# 2**1=2 , lebih kecil dari 3 , decimal 3-2=1 , tambahkan binary dengan 1 , sisa decimal 1 , Binary = 1010100111
# Sekarang sisa decimal = 1 yang mana 2**0=1 , tambahkan binary dengan 1 , Hasil binary adalah 10101001111


AddThis Social Bookmark Button

Binary to Hexadecimal Conversion


Binary | Hexa
0000     0
0001     1
0010     2
0011     3
0100     4
0101     5
0110     6
0111     7
1000     8
1001     9
1010     A
1011     B
1100     C
1101     D
1110     E
1111     F


AddThis Social Bookmark Button

Net Config Server Command

Friday, February 18, 2011


The Net Config Server command is the subset or command line tool to configure the Computer Property page in System applet. This command is very useful to check couple of things.

You can configure the following settings using the Net Config Server command:
1. Configure the computer description to be shown when browsing through network.
2. Make server hidden when browsing network.
3. Configure maximum connection time for the client computers to this server.

* Server Name \\computer_name
* Server Comment
* Software version Windows 2002
* Server is active on
* Server hidden No
* Maximum Logged On Users 10
* Maximum open files per session 16384
* Idle session time (min) 15

The above is an example of Net Config Server command. The above output from this command shows the Server Name, Server Comment etc. You can change the Server comment by using the following command:

Net Config Server /SRVCOMMENT: “Internet Information Server”

In the same way, you can use the following command to change the server’s visibility in network:

Net Config Server /HIDDEN: Yes / No

The “Maximum Logged On Users” displays the number of connections this server can accept over the network. It displays maximum 10 that means only 10 users can log on to this server or access files over the network. You can not change this.

The “Idle session time (min)” is the time up to which users can be active on this server. After expiry of this time, the users will be disconnected automatically and they have to log on to again to access files. By default, it is 10 minutes but you can change it to as per your requirement. To change the idle time setting, please use the following command:

Net Config Server /AUTODISCONNECT: 3

source : support.microsoft.com


AddThis Social Bookmark Button

Memahami fstab (File System Table)

Friday, January 7, 2011


Di dalam linux biasanya terdapat file fstab yang terletak pada /etc
fstab adalah file konfigurasi yang berisi informasi partisi yang akan di mount pada startup.
Anda harus login sebagai root user untuk mengedit fstab
Berikut ini contoh informasi yang terkandung di dalam fstab :


kolom pertama dan kedua adalah device dan default mount point.

kolom ketiga adalah type filesystem yang digunakan.

biasanya ada ext2, ext3, reiserfs, swap, vfat, ntfs, dan auto.
auto bukanlah filesystem, maksudnya agar type filesystem tersebut di deteksi secara otomatis oleh linux, misalnya floopy dan CDROM, kadang-kadang floopy di format di windows sebagai fat dan di linux sebagai ext2, ada baiknya jika linux yang otomatis mendeteksi filesystem yang digunakan.

kolom keempat adalah options yang digunakan.

auto dan noauto, dengan opsi auto partisi tersebut akan otomatis mount pada saat booting linux, jika anda tidak ingin men-mount pada saat booting gunakan noauto

user dan nouser, dengan opsi user dapat mengizinkan user mana yang boleh men-mount partisi tersebut, opsi nouser hanya memperbolehkan root untuk men-mount partisi tersebut

exec dan noexec, dengan opsi exec memperbolehkan file binary untuk di eksekusi pada partisi tersebut

ro, mount sebagai read-only

rw, mount sebagai read-write

sync dan async, maksudnya adalah bagaimana input dan output terhadap filesystem tersebut diberlakukan, pada contoh diatas floopy menggunakan opsi sync, yang mana ketika sebuah file di copy-kan ke floopy tersebut, perubahan langsung dilakukan secara bersamaan

defaults, menggunakan opsi defaults yaitu rw, suid, dev, exec, auto, nouser, dan async

kolom kelima dan keenam adalah dump dan fsck option

dump adalah backup utility, pada kolom kelima adalah dump option yang digunakan untuk memutuskan apakah akan di backup atau tidak, jika 0 dump akan meng-ignore filesystem tersebut, biasanya default adalah 0

fsck adalah filesystem check utility, pada kolom keenam adalah filesystem check option, jika 0 fsck tidak akan mengecheck filesystem tersebut.


AddThis Social Bookmark Button

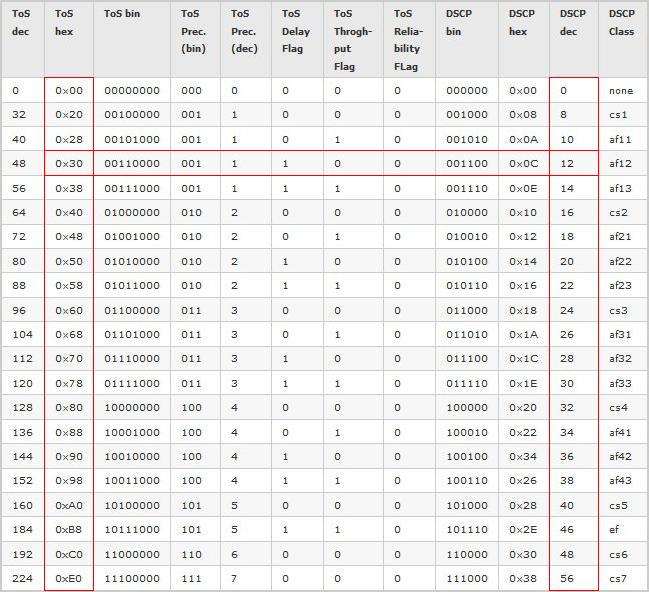
Table TOS to DSCP


AddThis Social Bookmark Button

uBuntu 10.10 , not auto-select to default

Saturday, December 25, 2010


Baru aja saya menginstal uBuntu 10.10
semua berjalan normal, tanpa disadari ketika reboot dan masuk ke menu list select OS
semua berhenti disana, tanpa mau masuk ke default select OS nya.

seperti kita ketahui skrng tidak ada lagi menu.lst yang ada adalah grub.cfg
tp ingat grub.cfg sebaiknya tidak di modifikasi secara langsung.
grub.cfg secara otomatis di generate setelah pemanggilan command update-grub.

OK skrng langsung aja ke caranya, tapi cara ini sedikit memaksa untuk melakukan auto-select ke default 0

# Pastikan dulu bahwa partisi /boot tidak di mount ke read-only
nano /etc/fstab

# Backup dulu 00_header
cd /etc/grub.d
cp 00_header 00_header.bak

# Buang permission execute pada 00_header.bak agar tidak ikut di eksekusi pada process update-grub kedalam grub.cfg
chmod a-x 00_header.bak

# Edit 00_header dan edit bagian make_timeout ()
ubah -1 menjadi ${2}

# Lakukan process update-grub untuk menggenerate grub.cfg yang baru
update-grub

# Cek apakah grub.cfg sudah terjadi perubahan pada timeout
less /boot/grub/grub.cfg

# partisi /boot sudah dapat di mount ke read-only lagi

AddThis Social Bookmark Button

Setting DHCP Server di ubuntu

Monday, December 13, 2010

# Cek dulu apakah sudah terinstal module dhcp server
dpkg -l | grep dhcp

# Jika belom ada instal dhcp3-server
apt-get update
apt-get install dhcp3-server

# Setting Interface DHCP Server
vi /etc/default/dhcp3-server

# Setting Konfigurasi DHCP server
vi /etc/dhcp3/dhcpd.conf


AddThis Social Bookmark Button

Setelah Clone VMWare Image Interface eth0 not working

# Cek Up interface
ifconfig -a

# Jika eth0 tidak terlihat dan ternyata ada interface eth1, edit :
vi /etc/udev/rules.d/70-persistent-net.rules

# Jika ada 2 eth , delete setting eth0 yang lama, dan kemudian ubah eth1 menjadi eth0

SUBSYSTEM=="net", ACTION=="add", DRIVERS=="?*", ATTR{address}=="00:0c:29:d8:01:73", ATTR{dev_id}=="0x0", ATTR{type}=="1", KERNEL=="eth*", NAME="eth0"

# Save dan Quit
:wq

# Reboot System
reboot


AddThis Social Bookmark Button

Mensetting Static IP Address pada ubuntu server

login sebagai root

# Stop Service Networking
/etc/init.d/networking stop

# Edit Network Interface
vi /etc/network/interface

secara default ubuntu server menggunakan dhcp client
auto eth0
iface eth0 inet dhcp

edit bagian tersebut menjadi :
auto eth0
iface eth0 inet static
address 192.168.X.X
netmask 255.255.255.0
network 192.168.X.0
broadcast 192.168.X.255
gateway 192.168.X.X

# Save dan Quit
:wq

# Edit DNS name server
vi /etc/resolv.conf

isikan name server sesuai konfigurasi network anda
nameserver 192.168.X.X

# Save dan Quit
:wq

# Start Service Networking
/etc/init.d/networking start


AddThis Social Bookmark Button

IPTables and NetFilter Load Balancing using CONNMARK

Sunday, December 12, 2010

About connmark load-balancing

This article explains how to perform load balancing on a router on Linux-2.6 using netfilter and iptables with the connmark module. The purpose is to show how we can use several internet connections to provide a faster internet access to all the machines of a local network. We want all the outgoing connections to be spread across all the available links. All the routing has to be implemented on a single router machine, there is no need to change the configuration of the machines on the local network. It should work on all flavours of Linux that come with a recent linux-2.6 kernel. You will also need the iproute2 package and the basic networking tools to be installed, but that is the case with all of the major linux distributions.


Example of networking environment

To explain how we do load-balancing using the connmark module, we will use the following network environment:

* There is local network (192.168.157.0/24) made of four desktop machines running various operating systems such as Windows and Linux. These machines are named Saturn, Desktop2, Desktop3. All the examples will be based on Saturn, and the other desktops will behave in the same way. All of these machines use Jupiter (192.168.157.253) as the default gateway. There is no advanced routing work to do on these desktops.


* The router of the network is Jupiter. It has three ethernet interfaces. The first one is eth0 (192.168.157.253), and it's connected to the local network. The other interfaces are eth1 (10.37.1.253) and eth2 (10.37.2.253). They are connected to two ethernet modems connected to two adsl links. All the interesting firewalling and routing is done on Jupiter.

* Somewhere else there is a server named Neptune connected to the internet. There is no direct link between the local network and Neptune. Neptune just acts as a normal server with no specific routing configuration. It is just used as a mere remote server in this article. For instance, it can be a web server running Apache, responding to requests made on port tcp/80. It will also work with any other service listening on any port.

* The purpose of this article is to show how we can balance the connections on Jupiter to use the whole available bandwidth provided by the two adsl links. All the connections are initiated by the desktops connected to the local network, and all connections are made to Neptune. Of course, it would work on any remote server, but we just need one machine to act as the remote server for the tests.


* In the diagram, we are using internal IP addresses (192.168.157.a, 10.37.b.c, 172.16.1.d). In a real environment all of the interfaces connected to the internet will probably have public IP addresses. They can also be private addresses in case the modems work in NAT mode. In that case each modem has two IP addresses: the private internal address on the ethernet interface, and the public IP address on the WAN interface.


* This article explains how to perform load-balancing between two links, but obviously you can do the same thing with as many links as you want.

* The tests have been made on a router running gentoo linux with a 2.6.24 kernel and iptables-1.4.0


Requirements

You will need a recent linux-2.6 kernel and a recent iptables version since we are using advanced netfilter modules that have been introduced or changed in recent linux-2.6 versions. Here are the features we will need:

* the netfilter CONNMARK target module is used to mark the packets that belong to a connection. It was introduced in linux-2.6.12.

* the netfilter statistic match module is used to decide which link to use. This feature has been merged in linux-2.6.18. Fortunately RHEL5 (Redhat Enterprise Linux 5) is based on linux-2.6.18 so this feature is available in RHEL5.

* you also need an iptables version that supports the statistic match. It is available in iptables-1.4.0, and probably in older versions as well. To know if your iptables supports it, you can either have a look at man iptables or check that there is a file named libxt_statistic.so in /lib/iptables or /lib64/iptables on your system.

* it seems that the old iptables versions support the same feature in a module named libxt_nth.so. The nth and random matches have been merged in recent iptables into a module named statistic.


How this load balancing works

Netfilter is a stateful firewall. This means that it is able to know to which connection an IP packet belongs. The connections are managed by the connection tracking module (connmark). It's important that we respect the connections when routing the packets. All the IP packets of one connection must be routed through the same link. If we route the packets of one connection through two different links, it would break the connection. This is why netfilter has a state table in memory. It uses it to remember the state of a connection, and in that way if can identify all of the packets that belong to that connection.

Everytime a new connection is created we will choose which link to use. In our example, two links can be used to route the packets on Jupiter. So we will have to choose between link1 and link2. Once the choice is made, we route the packets to either eth0 (interface connected to the link1) or eth1 (interface connected to the link2). Once the routing decision has been taken on the first IP packet of the connection, we will have to write this decision in the firewall state table so that we can do the same routing on the following packets of this connection.

We must notice that the netfilter connection tracking system is able to work on UDP packets. The UDP transport is often said to be "non connected mode" because there is no sequence number in the packets. However, the connection tracking considers that UDP packets with the same source/destination IP-addresses/ports are part of a connection. So the load balancing will be able to work on UDP traffic as well as TCP.

The load balancing works at the connection level. The routing decision (which link to use) is taken regardless of what the IP addresses or what the ports are. It means it will not take the source IP / destination IP / source port / destination port into account, so the load balancing is done for all the client computers the same way, and it works for all the services. This is important because it means that the load balancing will be efficient even when only one desktop of the local network is using the network. Jupiter will just spread all the incoming connections from the local network (eth0) to the available links (eth1 and eth2), whoever the users are.

Unfortunately, the load balancer will not be able to efficiently spread the incoming packets in the case that there is a single connection that requires a lot of bandwidth. It's just not possible to do that, because routing the packets of one connection to more than one link would break the tcp connection. The receiver would see IP packets with different source IP addresses, and it would drop the packets.


Overview of the load balancing

Now, let's see how we can do routing to balance the packets. The old route and the recent iproute2 tools all work at the IP level. The problem is the connections depend on the source and destination ports, which are decided at the transport level (TCP and UDP).

To solve that problem, we will use the netfilter connection tracking (conntrack) and connection marking (connmark) modules. They will identify which IP packets belong to which tcp/udp connection, and these modules will be used to put a mark on these packets. This mark is the fwmark attribute. In this article we may refer to this attribute using either fwmark or just mark. Keep in mind that this is the same attribute. This attribute is not part of the IP header, it's just in the router memory. In the second stage of the load balancing, the routing will use this mark to know to which ethernet device the packet must be routed. iproute2 is the package that we will use to make advanced routing. The ip rule command is used to provide policy routing, and it's able to perform IP routing based on the fwmark attribute.

Obviously the packet must have been marked by netfilter before it reaches the routing code. That's why it's important to remember "when" netfilter works on the packets. Netfilter has five hooks in the kernel network stack. It means there are five places where the netfilter functions can work on the packets. Here are the kinds of packets that can be seen by each of the five hooks:

* PREROUTING: all the incoming packets whatever the destination address is
* POSTROUTING: all the outgoing packets whatever the source address is
* FORWARD: all the packets that are routed
* INPUT: all the packets that are sent to the local machine
* OUTPUT: all the packets sent by the local machine

So if we mark the packets at POSTROUTING, the routing code will not see the mark and the advanced routing will have no effect. That's why we must work in the PREROUTING hook for incoming routed packets, and in the OUTPUT hook if we want to route the packets sent by the router itself.


Marking the packets with connmark

About the netfilter tables
Netfilter and iptables work with three tables:
* filter: the most popular table, it's mostly used for firewalling, to accept or reject packets
* nat: it's used for Network Address Translation
* mangle: it's mostly used to modify network packets

We will work with the mangle table since we want to change an attribute of a packet (the fwmark).

The connection states
netfilter is a module that inspects packets and decides whether or not they match specific criteria. netfilter executes an action associated with a match only when the match returns true. This is how the connection tracking module gives access to the state of the connection. This is done via -m state. Here are the various states:
* NEW: the packet is initiating a new connection (it may be a SYN packet in TCP)
* ESTABLISHED: the packet is associated with a connection which has seen packets in both directions
* RELATED: the packet is starting a new connection which is associated with an existing connection (it may be a data connection if FTP)
* INVALID: the packet is not associated with a valid connection

These states are important since we must take a routing decision for new packets only, and keep the current decision for packet that are part of an existing connection.

The statistic match
The statistic netfilter module provides two modes: nth and random:
* nth: this mode allows you to know what is the index of the packet in the list of received packets. In other words, you know if it's the first, the second, the third, the fourth, ... You can use the option named every to reset the counter when it reaches a value. That way the indexes associated with the packets can be something like: 1, 2, 3, 1, 2, 3, 1, 2, 3, ... when every is 3.
* random: this mode allows you to select random packets. You can provide a probability such as 0.33 if you want to grab 33% of the packets.

In old linux/iptables versions, these two modes were implemented in two different modules. So you may need to change the iptables instructions if you are using a linux kernel prior to 2.6.18.

The connmark target
An ipfilter target is a module that runs an action. We will need both the MARK target to put a mark on a packet, and CONNMARK to manage the netfilter state table:
* -j MARK --set-mark: this action is used to write the fwmark on an IP packet. The value of the mark is given as a parameter of this action.
* -j CONNMARK --save-mark: this action is used to write the fwmark of a packet in the state table (from packet to state table)
* -j CONNMARK --restore-mark: this action is used to write the fwmark of the state table in the ip packet (from state table to packet)


Initialization of a new connection

We want to set the fwmark attribute on a packet everytime we receive a packet that initiates a new connection. To do that we will use the -m state --state NEW match and the associated actions will be to set the mark in the IP packet and to save the mark in the state table so that we can re-use it later for other packets of this connection.

The CONNMARK target provides an option named --set-mark X that is supposed to set the fwmark on a packet. It did not work during the tests, the mark was still 0. That's why we will use the following target instead: -j MARK --set-mark 1.

First, we use this match to select the packets that initiates a new connection: -m state --state NEW . Here is an example of what the conntrack module can do when it executes a match such as -m state --state NEW:
* the conntrack code sees that the current tcp packet is from 192.168.157.3:45238 to 172.16.1.100:80
* the module finds no existing tcp connection from 192.168.157.3:45238 to 172.16.1.100:80 in the netfilter state table, so it considers the state as NEW, it creates a new entry in the state table and it returns true
* netfilter sees that the match returned true, so the action associated with the match will be executed

Once a packet has been selected by the previous match, we want to use the MARK target to set the fwmark attribute in the packet, and we also want to use the CONNMARK target to save the fwmark that is associated with the new connection. We create two new chains named CONNMARK1 and CONNMARK2 (one for each link) since there are two targets associated with one match. Here is an example of what the connmark target can do when it executes a rule such as -j CONNMARK --save-mark:
* the connmark module sees that the current tcp packet is from 192.168.157.3:45238 to 172.16.1.100:80
* the module finds the state table entry that has just been created for the new connection from 192.168.157.3:45238 to 172.16.1.100:80
* it saves the fwmark attribute seen in the packet to the copy of this attribute in the state table entry

Here are the iptables instructions we use to mark the new packets:

# initialise two chains that will put the mark on the packet and keep it in memory
iptables -t mangle -N CONNMARK1
iptables -t mangle -A CONNMARK1 -j MARK --set-mark 1
iptables -t mangle -A CONNMARK1 -j CONNMARK --save-mark

iptables -t mangle -N CONNMARK2
iptables -t mangle -A CONNMARK2 -j MARK --set-mark 2
iptables -t mangle -A CONNMARK2 -j CONNMARK --save-mark

# if the mark is zero if means the packet does not belong to any existing connection
iptables -t mangle -A PREROUTING -p tcp -m state --state NEW \
-m statistic --mode nth --every 2 --packet 0 -j CONNMARK1
iptables -t mangle -A PREROUTING -p tcp -m state --state NEW \
-m statistic --mode nth --every 2 --packet 1 -j CONNMARK2


Packets of an existing connection

Now we have to work on the packets that belong to an existing connection. We have to keep the same routing decision as the one that was made for the first packet of this connection, else it would break the connection. So we first have to use the -m state --state ESTABLISHED,RELATED match to select the packets, and then we will have to find the fwmark attribute that is associated with this connection in the state table, and write this fwmark in the IP packet.

First we use the match -m state --state ESTABLISHED,RELATED to select the packets that belong to an existing connection. It's important not to mark the packets in both directions, else it would disturb the routing. The mark must only be set on packets routed from the local network (from interface eth0) to the adsl links. So we use -i eth0 to be sure we don't select the packets that go in the other direction. Here is an example of what the conntrack module does when it executes a match such as -m state --state ESTABLISHED,RELATED:
* the conntrack code sees that the current tcp packet is from 192.168.157.3:45238 to 172.16.1.100:80
* the module finds an existing tcp connection from 192.168.157.3:45238 to 172.16.1.100:80 in the netfilter state table, so the state of this packet is either ESTABLISHED or RELATED, so the match returns true
* netfilter sees that the match returned true, so the action associated with the match will be executed

here is an example of what the connmark target does when it executes an instruction such as -j CONNMARK --restore-mark:
* the connmark module sees that the current tcp packet is from 192.168.157.3:45238 to 172.16.1.100:80
* the module finds an existing tcp connection from 192.168.157.3:45238 to 172.16.1.100:80 in the netfilter state table
* it reads the fwmark attribute that has been stored in the netfilter state table and it writes it in the fwmark attribute of the packet. This attribute will be used by the routing code.

Here is the only iptable instruction we have to write to do that:

iptables -t mangle -A PREROUTING -i eth0 -p tcp \
-m state --state ESTABLISHED,RELATED -j CONNMARK --restore-mark


The whole iptables marking code

# initialise two chains that will put the mark on the packet and keep it in memory
iptables -t mangle -N CONNMARK1
iptables -t mangle -A CONNMARK1 -j MARK --set-mark 1
iptables -t mangle -A CONNMARK1 -j CONNMARK --save-mark

iptables -t mangle -N CONNMARK2
iptables -t mangle -A CONNMARK2 -j MARK --set-mark 2
iptables -t mangle -A CONNMARK2 -j CONNMARK --save-mark

# get the mark on the packet that belongs to an existing connection
iptables -t mangle -A PREROUTING -i eth0 -p tcp \
-m state --state ESTABLISHED,RELATED -j CONNMARK --restore-mark

# if the mark is zero it means that the packet does not belong to any existing connection
iptables -t mangle -A PREROUTING -p tcp -m state --state NEW \
-m statistic --mode nth --every 2 --packet 0 -j CONNMARK1
iptables -t mangle -A PREROUTING -p tcp -m state --state NEW \
-m statistic --mode nth --every 2 --packet 1 -j CONNMARK2


Routing the marked packets


To route the packets using the mark attribute, we have to use the ip rule command. It's named policy routing. We have to create secondary routing tables that will be used when the mark attribute of a packet matches a rule.


Create new routing tables
First, we have to create these two routing tables by editing /etc/iproute2/rt_tables. Here is the code that automatically creates two tables called rt_link1 and rt_link2.

if ! cat /etc/iproute2/rt_tables | grep -q '^251'
then
echo '251 rt_link1' >> /etc/iproute2/rt_tables
fi
if ! cat /etc/iproute2/rt_tables | grep -q '^252'
then
echo '252 rt_link2' >> /etc/iproute2/rt_tables
fi


Here is the list of the routing tables you should have on Jupiter:

# -----------/etc/iproute2/rt_tables------------
# reserved values
255 local
254 main
253 default
0 unspec
# custom routes
252 rt_link2
251 rt_link1

Now we must populate these two routing tables. The best thing to do is just to add one default route in each table. Each default route drives the packet to the ethernet card where the link to use is connected. That way, when a packet marked with fwmark=1 follows the default route written in rt_link1, it will be sent to Neptune through device eth1. We also use ip route flush to be sure that the table is empty.

ip route flush table rt_link1
ip route add table rt_link1 default dev eth1
ip route flush table rt_link2
ip route add table rt_link2 default dev eth2


Use the new tables with policy routing

Now we have to use the ip rule command to say what to do with the marked packets. The following lines say that the packets having the mark fwmark=1 must follow the routing instructions of the routing table named rt_link1, and the packets with the second mark must use rt_link2. At the end we flush the routing cache to be sure that the new rules are taken into account.

ip rule del from all fwmark 2 2>/dev/null
ip rule del from all fwmark 1 2>/dev/null
ip rule add fwmark 1 table rt_link1
ip rule add fwmark 2 table rt_link2
ip route flush cache


Here is the list of all rules after these commands are executed:

# ip rule show
0: from all lookup local
32764: from all fwmark 0x2 lookup rt_link2
32765: from all fwmark 0x1 lookup rt_link1
32766: from all lookup main
32767: from all lookup default


Linux network parameters

There are two network parameters that have to be checked if you want your router to behave as expected. First we want to be sure that the kernel running on Jupiter is configured to route the packets. To enable routing on IPv4 you must set ip_forward to 1 (1 means enabled, 0 means disabled).

echo 1 >| /proc/sys/net/ipv4/ip_forward

You must also disable Reverse Path Filtering. It's an option enabled by default that increases the security and prevents ip spoofing by checking that the source address of the incoming packets matches the routing table on the local machine. Since we are doing a complex setup, this option would lead to dropping our packets, so it must be disabled.

echo 0 >| /proc/sys/net/ipv4/conf/all/rp_filter

These changes will be lost if you reboot your server. You can either ensure that they are automatically executed by a script at boot time, or you can edit your network configuration files to be sure that these changes will be kept after reboot. On Gentoo and Redhat you have to edit /etc/sysctl.conf:

# /etc/sysctl.conf
#
# Enables packet forwarding
net.ipv4.ip_forward = 1
# Disable reverse path filtering
net.ipv4.conf.all.rp_filter = 0


Source Network-Address-Translation (SNAT)

Now the packets from Saturn to Neptune should be routed as expected. But there is still one problem to solve. The replies sent by Neptune to Saturn will ignore the advanced routing and will always be sent through the same link, the one that matches the route to 192.168.157.3 that is configured on Neptune. When Neptune receives packets from Saturn, the source address is 192.168.157.3. Since there is no advanced routing configured on Neptune, the packets to Saturn just follow the normal route.

This is a case of asymmetric routing. Half the packets from Saturn to Neptune are routed through the second link because of the advanced routing on Jupiter. And the replies to these packets are sent through the first link just because it's normal routing. What we have to do is to configure SNAT (Source Network-Address-Translation) on Jupiter so that all packets sent through link1 or link2 come with a rewritten source address. We want the source address of the packets from link1 to be 10.37.1.253 and the source address of the packets from link2 will be 10.37.2.253. That way Neptune will receive packets with a source address that matches the link from which they come. When Neptune replies to the requests coming from link1 or link2 it will just use the source address seen in these packets as the new destination address.

You can also notice that the SNAT involves an implicit DNAT (Destination Network-Address-Translation). When Jupiter receives a packet on eth2 (the interface where the second link is connected), it works because the destination address is 10.37.2.253. This is a reply to a packet from Saturn (192.168.157.3), so we want Jupiter to change the destination address, and to forward it to Saturn. This is done by the implicit DNAT.

It's important to notice that the Source address NAT is executed in POSTROUTING. That way it's executed after the routing, which is the place where we drive each packet to the correct device (either eth1 or eth2 on Jupiter). The SNAT iptable rule uses the "outgoing device" match to determine what source address must be written in the packet header.

In case you are using ADSL links between Jupiter and Neptune, you will be forced to use public IP addresses outside of your local network. Most modems can do NAT for you. In that case you don't have to worry about that.

Here is the code to configure SNAT on Jupiter:

iptables -t nat -F
iptables -t nat -X
iptables -t nat -A POSTROUTING -o eth1 -j SNAT --to-source 10.37.1.253
iptables -t nat -A POSTROUTING -o eth2 -j SNAT --to-source 10.37.2.253

Troubleshooting

Here is what you can do in case it does not work:

Check your firewall

In this article we assumed that the packet filtering is not enabled on your router and on your network. In case you are using iptables already, you will have to check that it's consistent with the new iptables rules involved in the destination port routing. It does not mean that you have to keep your firewall wide open to get the load balancing to work, it just means that the filtering may disturb the load balancing in the case that it's not correctly configured.

List the current connections details

The connection tracking module exports very useful information about the connections state table. You can read the file /proc/net/ip_conntrack that contains all the important attributes about the current connections, including the fwmark attribute:

% cat /proc/net/ip_conntrack
tcp 6 96 TIME_WAIT src=192.168.157.3 dst=172.16.1.100 sport=52037
dport=80 packets=6 bytes=414 src=172.16.1.100 dst=10.37.1.253
sport=80 dport=52037 packets=4 bytes=938 [ASSURED] mark=1 use=1
tcp 6 96 TIME_WAIT src=192.168.157.3 dst=172.16.1.100 sport=52035
dport=80 packets=6 bytes=414 src=172.16.1.100 dst=10.37.1.253
sport=80 dport=52035 packets=4 bytes=938 [ASSURED] mark=1 use=1
tcp 6 96 TIME_WAIT src=192.168.157.3 dst=172.16.1.100 sport=52039 dport=80
packets=6 bytes=414 src=172.16.1.100 dst=10.37.1.253 sport=80
dport=52039 packets=4 bytes=938 [ASSURED] mark=1 use=1
tcp 6 96 TIME_WAIT src=192.168.157.3 dst=172.16.1.100 sport=52036
dport=80 packets=6 bytes=414 src=172.16.1.100 dst=10.37.2.253
sport=80 dport=52036 packets=4 bytes=938 [ASSURED] mark=2 use=1
tcp 6 96 TIME_WAIT src=192.168.157.3 dst=172.16.1.100 sport=52038
dport=80 packets=6 bytes=414 src=172.16.1.100 dst=10.37.2.253
sport=80 dport=52038 packets=4 bytes=938 [ASSURED] mark=2 use=1


Logging packets with iptables

In case you have problems, you may want to enable the logging so that you can see all the packets that go through a specific netfilter instruction. To enable logging, you can replace a simple iptables action (such as CONNMARK) with a customized chain (such as LOG_FWMARK). Everytime a packet is marked you will also have a message written in your logs. For instance, you can replace this simple iptables command:

iptables -t mangle -A PREROUTING -i eth0 -p tcp \
-m state --state ESTABLISHED,RELATED -j CONNMARK --restore-mark

With the following chain:

# create a new chain to both restore the mark and log the packet
iptables -t mangle -N RESTOREMARK
iptables -t mangle -A RESTOREMARK -j CONNMARK --restore-mark
iptables -t mangle -A RESTOREMARK -j LOG --log-prefix 'restore-mark: ' --log-level info

# restore the fwmark to packet that belongs to an existing connection
iptables -t mangle -A PREROUTING -i eth0 -p tcp \
-m state --state ESTABLISHED,RELATED -j RESTOREMARK

It's important that you execute -j CONNMARK --restore-mark before -j LOG --log-prefix 'restore-mark: ' because you want to have the details of the packet attributes when it has already been changed. Unfortunately the default LOG match does not display the fwmark attribute. So it may be difficult to know whether or not the mark in the packet is what you expect. What you can do is you can edit the source code of the LOG target in the kernel sources, but it means you have to recompile it. Here is what you need to change:

root@jupiter /usr/src/linux-2.6.24.07 % diff -u net/ipv4/netfilter/ipt_LOG.000 net/ipv4/netfilter/ipt_LOG.new
--- net/ipv4/netfilter/ipt_LOG.old 2008-05-31 19:40:38.000000000 +0100
+++ net/ipv4/netfilter/ipt_LOG.new 2008-06-01 16:29:25.000000000 +0100
@@ -56,6 +56,8 @@
printk("SRC=%u.%u.%u.%u DST=%u.%u.%u.%u ",
NIPQUAD(ih->saddr), NIPQUAD(ih->daddr));

+ printk("FWMARK=%u ", (unsigned int)skb->mark);
+
/* Max length: 46 "LEN=65535 TOS=0xFF PREC=0xFF TTL=255 ID=65535 " */
printk("LEN=%u TOS=0x%02X PREC=0x%02X TTL=%u ID=%u ",
ntohs(ih->tot_len), ih->tos & IPTOS_TOS_MASK,


You can also disable logging of attributes that you consider useless since the messages are very detailed and hard to read. Here is what you can get with the patched LOG target:

iptables-mark1: IN=eth0 OUT= SRC=192.168.157.3 DST=172.16.1.100 FWMARK=1 ID=53070 SPT=44426 DPT=80
restore-mark: IN=eth0 OUT= SRC=192.168.157.3 DST=172.16.1.100 FWMARK=1 ID=53071 SPT=44426 DPT=80
restore-mark: IN=eth0 OUT= SRC=192.168.157.3 DST=172.16.1.100 FWMARK=1 ID=53072 SPT=44426 DPT=80
restore-mark: IN=eth0 OUT= SRC=192.168.157.3 DST=172.16.1.100 FWMARK=1 ID=53073 SPT=44426 DPT=80
restore-mark: IN=eth0 OUT= SRC=192.168.157.3 DST=172.16.1.100 FWMARK=1 ID=53074 SPT=44426 DPT=80
restore-mark: IN=eth0 OUT= SRC=192.168.157.3 DST=172.16.1.100 FWMARK=1 ID=53075 SPT=44426 DPT=80


Use a network sniffer

You can use a sniffer such as tcpdump (console) or wireshark (graphical mode) to check what packets are transmitted and with which attributes.

Routing configuration on Saturn

Even if 95% of the networking configuration has to be done on the router (Jupiter) don't forget to set a route to Neptune on Saturn. It may be necessary if Jupiter is not the default gateway on Saturn. Here is what to do on Saturn:

ip route add 176.16.1.100 via 192.168.157.253


Complete code of the load-balancing script

#!/bin/bash

echo 1 >| /proc/sys/net/ipv4/ip_forward
echo 0 >| /proc/sys/net/ipv4/conf/all/rp_filter

# flush all iptables entries
iptables -t filter -F
iptables -t filter -X
iptables -t nat -F
iptables -t nat -X
iptables -t mangle -F
iptables -t mangle -X
iptables -t filter -P INPUT ACCEPT
iptables -t filter -P OUTPUT ACCEPT
iptables -t filter -P FORWARD ACCEPT

# initialise chains that will do the work and log the packets
iptables -t mangle -N CONNMARK1
iptables -t mangle -A CONNMARK1 -j MARK --set-mark 1
iptables -t mangle -A CONNMARK1 -j CONNMARK --save-mark
iptables -t mangle -A CONNMARK1 -j LOG --log-prefix 'iptables-mark1: ' --log-level info

iptables -t mangle -N CONNMARK2
iptables -t mangle -A CONNMARK2 -j MARK --set-mark 2
iptables -t mangle -A CONNMARK2 -j CONNMARK --save-mark
iptables -t mangle -A CONNMARK2 -j LOG --log-prefix 'iptables-mark2: ' --log-level info

iptables -t mangle -N RESTOREMARK
iptables -t mangle -A RESTOREMARK -j CONNMARK --restore-mark
iptables -t mangle -A RESTOREMARK -j LOG --log-prefix 'restore-mark: ' --log-level info

iptables -t nat -N SNAT1
iptables -t nat -A SNAT1 -j LOG --log-prefix 'snat-to-10.37.1.253: ' --log-level info
iptables -t nat -A SNAT1 -j SNAT --to-source 10.37.1.253

iptables -t nat -N SNAT2
iptables -t nat -A SNAT2 -j LOG --log-prefix 'snat-to-10.37.2.253: ' --log-level info
iptables -t nat -A SNAT2 -j SNAT --to-source 10.37.2.253

# restore the fwmark on packets that belong to an existing connection
iptables -t mangle -A PREROUTING -i eth0 -p tcp \
-m state --state ESTABLISHED,RELATED -j RESTOREMARK

# if the mark is zero it means the packet does not belong to an existing connection
iptables -t mangle -A PREROUTING -p tcp -m state --state NEW \
-m statistic --mode nth --every 2 --packet 0 -j CONNMARK1
iptables -t mangle -A PREROUTING -p tcp -m state --state NEW \
-m statistic --mode nth --every 2 --packet 1 -j CONNMARK2

iptables -t nat -A POSTROUTING -o eth1 -j SNAT1
iptables -t nat -A POSTROUTING -o eth2 -j SNAT2

if ! cat /etc/iproute2/rt_tables | grep -q '^251'
then
echo '251 rt_link1' >> /etc/iproute2/rt_tables
fi
if ! cat /etc/iproute2/rt_tables | grep -q '^252'
then
echo '252 rt_link2' >> /etc/iproute2/rt_tables
fi

ip route flush table rt_link1 2>/dev/null
ip route add table rt_link1 default dev eth1
ip route flush table rt_link2 2>/dev/null
ip route add table rt_link2 default dev eth2

ip rule del from all fwmark 0x1 lookup rt_link1 2>/dev/null
ip rule del from all fwmark 0x2 lookup rt_link2 2>/dev/null
ip rule del from all fwmark 0x2 2>/dev/null
ip rule del from all fwmark 0x1 2>/dev/null
ip rule add fwmark 1 table rt_link1
ip rule add fwmark 2 table rt_link2

ip route flush cache


AddThis Social Bookmark Button

Speed up your Internet access using Squid's refresh patterns

Bandwidth limitation is still a problem for a lot of people who connect to the Internet. You can improve your available bandwidth by installing Squid caching proxy server on your network with configuration parameters that will increase your byte hit rate, giving you about 30-60% more bandwidth.

Squid can be fine-tuned to satisfy a host of needs. The stable version has at least 249 configurable parameters. The heavily commented configuration file, usually found in /etc/squid.conf, is more than 4,600 lines long. This can be intimidating to even experienced administrators. All settings are to be modified in this file.

You need a big cache that will not fill up in less than a week, and preferably should take more than a month to fill up. The actual size will be dependent on the volume of traffic on your network. The bigger the size of your storage, the greater the probability that the object someone is requesting for will already be in your cache.

In addition to the memory required for your operating system and Squid to run, you will need memory of about 1% of your cache size to keep the database of your cache in memory. That is, for a cache of 100GB disk space, you will need about 1GB RAM, in addition to about 100MB for the OS and Squid.

The default maximum size of objects that may be cached by Squid is 4MB. Nowadays, this is too low for the media-rich Internet. If your clients download a lot of video and software packages, you can increase this to a figure more representative of the maximum size of files that your clients normally download -- say 100MB.

Refresh patterns determine what is saved and served from the cache. Ideally, you would want your squid to follow the directions of the Web servers serving the content to determine what is cacheable and for how long. These directions are set as HTTP headers that are processed and understood by Squid. Unfortunately, the directions given by most servers are the Web servers' defaults, and do not produce significant bandwidth savings.

Refresh patterns are of the format:

refresh_pattern [-i] regex min percent max [options]

where min and max are time values in minutes and percent is a percentage figure. The options are:

* override-expire
ignores the expire header from the Web server.
* override-lastmod
ignores the last modified date header from the Web server.
* reload-into-ims
a reload request from a client is converted into an If-Modified-Since request.
* ignore-reload
a client's no-cache or "reload from origin server" directive is ignored. The request can therefore be satisfied from the cache if available.
* ignore-no-cache
a no-cache directive from the Web server which makes an object non-cacheable is ignored.
* ignore-no-store
a no-store directive from the Web server which makes an object non-cacheable is ignored.
* ignore-private
a private directive from the Web server which makes an object non-cacheable is ignored.
* ignore-auth
objects requiring authorisation are non-cacheable. This option overrides this limitation.
* refresh-ims
a refresh request from a client is converted into an If-Modified-Since request.


Consult your configuration file to see which of these options are available in your version of Squid.

Refresh patterns are effective if there is no expire header from the origin server, or your refresh pattern has an override-expire option. Example:

refresh_pattern -i \.gif$ 1440 20% 10080

This says:

* If there is no expire header for all objects whose names end in .gif or .GIF (that is, image files) then:
* if the age (that is how long the object has been on your cache server) is less than 1,440 minutes, then consider it fresh and serve it and stop
* else if the age is greater than 10,080 minutes, consider it stale and go to the origin server for a fresh copy and stop
* else if the age is in between the min and max values, use the lm-factor to determine freshness. lm-factor is the ratio of the age on your cache server to the period since creation or modification of the object on the origin server as a percentage. So if the object was created 10,000 minutes ago on the origin server and it has been on my cache server for 1,800 minutes (that is the age) the lm-factor is 1,800/10,000 = 18%.
* If the lm factor is less than the percent in our refresh pattern (20%) then the object is considered fresh; serve it and stop
* else the object is stale, go for a fresh copy from the origin server.

For objects that scarcely change under the same file name, such as video, images, sound, executables, and archives, you can modify the refresh pattern to consider them fresh on your Squid for a longer time, increasing the probability of having hits. For example, you could modify our refresh pattern above to:

refresh_pattern ^ftp: 1440 20% 10080
refresh_pattern ^gopher: 1440 0% 1440
refresh_pattern -i \.(gif|png|jpg|jpeg|ico)$ 10080 90% 43200 override-expire ignore-no-cache ignore-no-store ignore-private
refresh_pattern -i \.(iso|avi|wav|mp3|mp4|mpeg|swf|flv|x-flv)$ 43200 90% 432000 override-expire ignore-no-cache ignore-no-store ignore-private
refresh_pattern -i \.(deb|rpm|exe|zip|tar|tgz|ram|rar|bin|ppt|doc|tiff)$ 10080 90% 43200 override-expire ignore-no-cache ignore-no-store ignore-private
refresh_pattern -i \.index.(html|htm)$ 0 40% 10080
refresh_pattern -i \.(html|htm|css|js)$ 1440 40% 40320
refresh_pattern . 0 40% 40320


Sometimes, for no good reason, at least from our perspective, origin servers, such as youtube.com, do everything to make it difficult or impossible for you to cache content. The options above should help you to overcome some of these limitations.

Refresh patterns are matched against all requests in order from the top until there is a matching rule. The last rule is a catch-all and will match any request that is not satisfied by any of the rules above it. There are normally separate catch-all default rules for other protocols like FTP and gopher at the very top of the list so as to exempt those protocols from the patterns below them.

By default, Squid will not cache dynamic content. Dynamic content is determined by matching against either "cgi-bin" or "?". This feature used to be activated via the "hierarchy_stoplist" and "cache deny" settings in older versions of Squid. In recent versions, starting with 3.1, this feature is activated via a refresh pattern such as refresh_pattern (/cgi-bin/|\?) 0 0% 0. This enables you to specify sites that serve dynamic content that could be made cacheable in bypass rules. For example, you could set up a refresh pattern such as:

refresh_pattern -i movies.com/.* 10080 90% 43200
refresh_pattern (/cgi-bin/|\?) 0 0% 0

Then, even if content from movies.com is served with "?" in their URL, the content will still be cached if all other conditions are met.

For the older versions of Squid, you will have to define an access control list (ACL) for the content providers you wish to make exceptions for, and use cache accept to exempt it before the cache deny rule. The following example is from the Squid wiki:

# Let the client's favourite video site through
acl youtube dstdomain .youtube.com
cache allow youtube
# Now stop other dynamic stuff being cached
hierarchy_stoplist cgi-bin ?
acl QUERY urlpath_regex cgi-bin \?
cache deny QUERY

Squid makes a lot of DNS requests, one dns request for each http request. Install a caching DNS server on your server and have Squid use it so as to cut down on your DNS requests. This how-to may be helpful.

Sites like Microsoft's windowsupdate.com, which virtually all Windows PCs update their OS from, are among the most bandwidth-intensive sites on some networks. Unfortunately, they are not cacheable because they offer partial responses (http return code 206), which Squid presently does not cache. Where you have control over the client machines, you can install Microsoft's Update Server to handle caching for windowsupdate. If you cannot use the Update Server, you can use Squid's delay pools -- a bandwidth management technique -- to limit the portion of bandwidth that windowsupdate consumes during your peak periods. The clients will then have to be online during off-peak periods to complete their updates.

Below, we configure one global delay pool at 64Kbps (8KBps). Traffic for which the ACL of destination domain is windowsupdate.com during the peak period of 10:00-16:00 will be limited to 64Kbps.

acl winupdate dstdomain .windowsupdate.com
acl peakperiod time 10:00-16:00
delay_pools 1
delay_class 1 1
# 64 Kbit/s
delay_parameters 1 8000/8000
delay_access 1 allow winupdate peakperiod

After making changes like the ones above, my Squid's byte hit rate increased from about 8% to between 26-37%. If you are doing 33%, it means a third of all traffic is coming from your cache, and not from slower links across the Internet. For monitoring and log analysis to determine the performance of your Squid, you can use squid3-client and calamaris.

AddThis Social Bookmark Button

Dasar dalam mensetting Netfilter Firewall dengan iptables

Tuesday, December 7, 2010

All Linux distributions come with the Netfilter firewall by default. As we mentioned, this firewall is implemented in the Linux kernel, which makes it very fast, and you manipulate the firewall with the iptables command. In this subsection I’ll give you a short introduction to the workings of iptables.
Configuring a firewall without the proper preparation is a very bad idea. Before you start
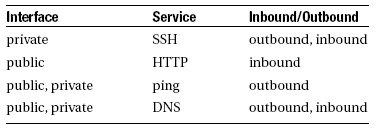
configuring, you should be very clear what exactly it is that you want and need your firewall to do. For a server that has a public as well as a private network card, you could make a table like the example in Table 5-3.

Table 5-3. Overview of Required Services for Your Firewall


Once you have a simple setup matrix like this, you can start configuring the firewall. But, before you start, you should know something about the way a Netfilter firewall is organized.


Netfilter Building Blocks
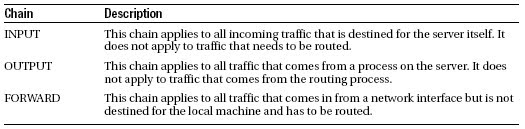
The most elementary building blocks for a Netfilter firewall are the chains, which are basically sets of rules that are applied to a certain traffic flow on your server. When setting up a Netfilter firewall, you start with three chains that by default are empty. To use these chains, you must add rules to them. Table 5-4 provides a short description of the three default chains.


Table 5-4. Chains Are the Basic Building Blocks for a Netfilter Firewall


Figure 5-1 is a schematic that provides an overview of the place where the three default chains are functioning. The NIC positions in the figure indicate that the network interface card is involved. As you can see in the figure, the INPUT chain applies to incoming traffic before it encounters server processes, the OUTPUT chain involves outgoing traffic after it leaves the server processes, and the FORWARD chain involves traffic that goes from one network board directly to another.


Figure 5-1. Overview of the Use of Netfilter Chains


The next requirement in a Netfilter configuration is a set of rules. In these rules, different packet types are defined, and a default action is defined for each of them as well. Three things may happen when a packet matches a rule: it can be accepted (ACCEPT), it can be dropped(DROP), and it can be logged (LOG). Note that, instead of DROP, which silently discards a packet, you can also use REJECT. In this case, a message is sent to the source of the packet. The rules are evaluated from top to bottom, and, as soon as a rule matches a packet, the rule is applied and no other rules are evaluated. The one exception to this is if the packet matches a LOG rule, in which case it is logged and continues to go on to the next rule. At the end of all rule sets, a policy must be defined. You must make sure that the default policy is always set to DROP, so you can make sure that only packets that specifically match a
rule are allowed and that everything else is dropped.


To define the rules, you’ll use the iptables command. Be aware that nothing you configure with iptables is stored automatically, so you need to store the rules that you create in a configuration file so that they are executed automatically the next time your server boots. You can, for example, put them in /etc/init.d/boot.local to ensure that they are activated at the earliest possible stage in the boot process.


Using iptables to Create a Firewall
When creating your own firewall with iptables, the first thing you need to do is to set some default policies. Do note, however, that the policy will become effective immediately, so, if you are configuring your firewall from an external connection, you will be locked out immediately. In this section, I’ll assume that you are configuring iptables from the machine itself (after all,y ou wouldn’t connect an unsecured server to the network, would you?). So start by creating some policies, entering the following commands:


iptables -P FORWARD DROP
iptables -P INPUT DROP
iptables -P OUTPUT DROP


Your server is now completely secure; in fact, it is so secure that even your graphical environment won’t come up anymore if it is installed, so don’t save this configuration and reboot your server yet. Let’s first do some additional tuning to allow for some minimal functionality.
Now that the default policy for every chain has been specified, you need to define the rules themselves. All rules must involve certain elements, and these are the matching parts, the target and the position in the chain. Basically, every iptables command uses the following generic structure:


iptables position_in_the_chain chain matching target

The next subsections describe how these are used.


Defining Matching Rules
An important part of every rule is the matching part, and the following list comprises the most popular elements that can be used for matching. Note that you don’t have to use all of them in a rule: if one of these elements isn’t specified, the rule is simply applied to all. For example, if you don’t specify a source IP address but you do specify a source port number, the rule applies to the source port number, coming from no matter what source IP address. The following elements can be used for matching in a rule:


Interface
Use this to specify the network interface to which the rule applies. The -o option is used to refer to an output interface, and -i is used for the input interface. It may not surprise you that -o isn’t used in the INPUT chain (because it refers to incoming packets only) and -i isn’t used in the OUTPUT chain (which refers to outgoing packets only).


Source/destination IP address
You can use -s (source) or -d (destination) to refer to an IP address. Both IP addresses for individual hosts and IP addresses for complete networks can be used. For example, use -s 192.168.0.1 to refer to one host only, or -s 192.168.0.0/16 for all hosts that have a network address starting with 192.168.

Protocol
Use this to refer to protocols as defined in the file /etc/protocols. Protocol numbers as well as protocol names as used in this file can be used here. For example, -p TCP refers to all packets in which TCP is used.

Ports
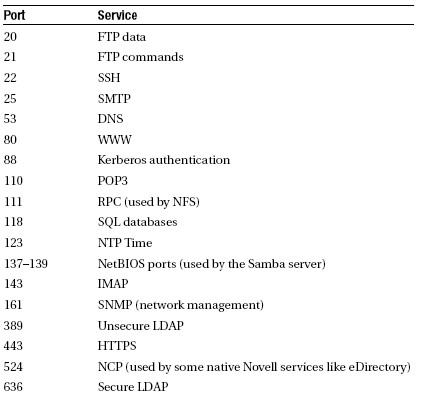
Another very popular method to filter, this one is based on TCP or UDP port numbers. You can use --sport to refer to a source port or --dport to refer to a destination port. Any port number can be used, so check /etc/services for a complete list of services and their default ports if you need more details. For example, use --sport 1024:65535 if you want to refer to all ports above port 1024, or use --dport 25 to refer to the SMTP port. Note that, when using a port specification, you should always use a protocol specification as well. So don’t just use --dport 25; use -p TCP --dport 25.


Specifying the Target
After specifying the matching criterion, a second part of all rules is the so-called target: the action that has to be performed when a rule matches a packet. All rules have a target, and the following targets are available:

ACCEPT : The packet is accepted.
REJECT : The packet is rejected, and a message is sent to its sender.
DROP : The packet is discarded and no message is sent to the sender.
LOG : The packet is logged. Note that this is the only target that doesn’t stop the packet from further evaluation.


Specifying the Position in the Chain
The very first thing you need to do is to specify where exactly in the chain you need to add a rule. Imagine, for example, that you want to disallow all traffic that has destination port 80, but you do want to allow all traffic coming from IP address 1.2.3.4. If you first create the rule that specifies the destination port and then create the rule for IP address 1.2.3.4, packets from 1.2.3.4 that have destination port 80 would be rejected as well. Order does matter. When creating a rule, the following options can be used to specify
where in the chain you want the rule to appear:

• -A: Add the rule to the end of the chain.
• -D: Delete the rule from the chain.
• -R: Replace a rule.
• -I: Insert the rule at a specific position. For example, use iptables -I INPUT 2 to place the rule on the second position in the INPUT chain.


Stateful Rules
When creating a rule to match packets that always use the same port numbers, everything is easy. Of course, this isn’t always the case. For example, a user who connects to a web server will always connect to that web server on port 80, but the packets sent back from the web server use a randomly chosen port number above 1024. You could create a rule in which outgoing packets on all ports above 1024 are opened, but that’s not ideal for security reasons.

A smart way of dealing with this problem is by using stateful packet filters. A stateful packet filter analyzes if a packet that goes out is part of an already established connection, and, if it is, it allows the answer to go out. Stateful packet filters are useful for replies that are sent by web servers and for FTP servers as well because, in the case of an FTP server, the connection is established on port 21, and, once the session is established, data is sent over port 20 to the client.
By using the --state option you can indicate what state a rule should look at. This functionality, however, is not a part of the core Netfilter modules, and an additional module has to be loaded to allow for state checking. Therefore, in every rule that wants to look at the state that a packet is in, the -m state option is used first, followed by the exact state the rule is looking at. For example, -m state --state RELATED,ESTABLISHED would look at packets that are part of related packets that are already allowed, or packets that are a part of an established session.
The state module isn’t the only module that can be used, and many other modules are available for more advanced configurations. For example, the nth module allows you to have a look at every nth packet (such as every third for example). Further discussion of modules is out of the scope of this book, so check the documentation page of the Netfilter web site at www.netfilter.
org/documentation for more in-depth information.


Creating the Rules
Based on this information, you should be able to create some basic rules. Let’s assume that you have a server that has only one NIC. On this network card, you want to allow requests to the web server to come in and replies from it to go out. Also, you want to allow SSH traffic. For the rest, no other services are needed.
Like any other Netfilter configuration, you would start this configuration by creating some policies. Every chain needs its own policy. The following commands make sure that no packet comes in or out of your server by setting the policy for each chain to DROP:


iptables -P FORWARD DROP
iptables -P INPUT DROP
iptables -P OUTPUT DROP


Now that everything is blocked, you can start by allowing some packets to go in and out. First and foremost, you have to enable the loopback interface because the policies that you’ve just defined also disable all traffic on the loopback interface and that’s not good (because many services rely on the loopback interface). Without loopback interface, for example, you have no way to start the graphical environment on your machine, and many other services will fail as well. Imagine that the login process queries an LDAP server that runs on the localhost.
Now open the loopback interface using the following two rules:

iptables -A INPUT -i lo -j ACCEPT
iptables -A OUTPUT -o lo -j ACCEPT


In these two rules, the -A option is used to refer to the chain the rules have to be added to. You are using -A, and so the rule is just appended to the INPUT and the OUTPUT chains. This would make the rule the last rule that is added to the chain, just before the policy that is always the last rule in a chain that is evaluated. Next, -i lo and -o lo are used to indicate that this rule matches to everything that happens on the loopback interface. As the third and last part of these two rules, the target is specified by using the -j
option (which is short for “jump to target”). In this case, the target is to accept all matching packets. So, now you have a server that allows nothing on the external network interfaces, but the loopback interface is
completely open.


Next, it’s time to do what you want to do on your server: allow incoming SSH and HTTP
traffic and allow replies to the allowed incoming traffic to be returned. Note that these two requirements consist of two parts: a part that is configured in the INPUT chain and a part that is configured in the OUTPUT chain. Let’s start with some nice rules that define the input chain:

iptables -A INPUT -m state --state ESTABLISHED,RELATED -j ACCEPT
iptables -A INPUT -p tcp --dport 22 -m state --state NEW -j ACCEPT
iptables -A INPUT -p tcp --dport 80 -m state --state NEW -j ACCEPT
iptables -A INPUT -j LOG --log-prefix "Dropped illegal incoming packet: "


The first rule in this INPUT chain tells Netfilter that all packets that are part of an already established or related session are allowed in. Next, for packets coming in on SSH port 22 that have a state NEW, the second rule indicates that they are allowed as well. Thirdly, packets that are sent to TCP destination port 80 (notice the combination between -p tcp and --dport 80 in this rule) and have a state NEW are accepted as well. The last rule finally makes sure that all packets that didn’t match any of the earlier rules are logged before they are dropped by the policy at the end of the rule. Note that logging all dropped packets as a default may cause big problems.


CAUTIONS Use logging only if you need to troubleshoot your firewall. It’s generally a bad idea to switch on logging by default, because, if not done properly, it can cause huge amounts of information to be written to your log files.

Now that you have defined the INPUT chain, let’s do the OUTPUT chain as well. No specific services have to be allowed out, with the exception of the replies to incoming packets that were allowed, and so creating the OUTPUT chain is rather simple and consists of just two rules:

iptables -A OUTPUT -m state RELATED,ESTABLISHED -j ACCEPT

iptables -A OUTPUT -j LOG --log-prefix "Dropped illegal outgoing packet: "

The use of these two rules should be clear from the explanation earlier in this section. Note that it is a good idea to turn on logging for the OUTPUT rule (unlike for the INPUT rule).


This is because, if an illegal packet should leave your server, that would indicate that some rogue service is active on your server and you would absolutely need to know about it. To make it a little easier to create your own Netfilter rules, Table 5-5 lists some of the port numbers that are commonly configured in a Netfilter firewall. For a complete list of all port numbers and the names of related services, check the contents of the /etc/services file, which lists all known services with their default ports.


Table 5-5. Frequently Used Port Numbers


Let’s stop talking about Netfilter. On a server that uses Netfilter as a kind of personal firewall, this is probably all you need to know. Notice, however, that much more can be done with iptables. But discussion of all that goes beyond the scope of this book, so check www.netfilter.org/documentation for very complete and overwhelmingly in-depth information.

Sumber : e-book Beginning Ubuntu Server Administration


AddThis Social Bookmark Button