Dasar dalam mensetting Netfilter Firewall dengan iptables
Tuesday, December 7, 2010
All Linux distributions come with the Netfilter firewall by default. As we mentioned, this firewall is implemented in the Linux kernel, which makes it very fast, and you manipulate the firewall with the iptables command. In this subsection I’ll give you a short introduction to the workings of iptables.
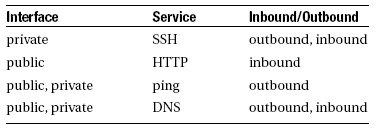
Configuring a firewall without the proper preparation is a very bad idea. Before you start configuring, you should be very clear what exactly it is that you want and need your firewall to do. For a server that has a public as well as a private network card, you could make a table like the example in Table 5-3.
Configuring a firewall without the proper preparation is a very bad idea. Before you start configuring, you should be very clear what exactly it is that you want and need your firewall to do. For a server that has a public as well as a private network card, you could make a table like the example in Table 5-3.
Table 5-3. Overview of Required Services for Your Firewall
Once you have a simple setup matrix like this, you can start configuring the firewall. But, before you start, you should know something about the way a Netfilter firewall is organized.
Netfilter Building Blocks
The most elementary building blocks for a Netfilter firewall are the chains, which are basically sets of rules that are applied to a certain traffic flow on your server. When setting up a Netfilter firewall, you start with three chains that by default are empty. To use these chains, you must add rules to them. Table 5-4 provides a short description of the three default chains.
Table 5-4. Chains Are the Basic Building Blocks for a Netfilter Firewall

Figure 5-1 is a schematic that provides an overview of the place where the three default chains are functioning. The NIC positions in the figure indicate that the network interface card is involved. As you can see in the figure, the INPUT chain applies to incoming traffic before it encounters server processes, the OUTPUT chain involves outgoing traffic after it leaves the server processes, and the FORWARD chain involves traffic that goes from one network board directly to another.
Figure 5-1. Overview of the Use of Netfilter Chains

The next requirement in a Netfilter configuration is a set of rules. In these rules, different packet types are defined, and a default action is defined for each of them as well. Three things may happen when a packet matches a rule: it can be accepted (ACCEPT), it can be dropped(DROP), and it can be logged (LOG). Note that, instead of DROP, which silently discards a packet, you can also use REJECT. In this case, a message is sent to the source of the packet. The rules are evaluated from top to bottom, and, as soon as a rule matches a packet, the rule is applied and no other rules are evaluated. The one exception to this is if the packet matches a LOG rule, in which case it is logged and continues to go on to the next rule. At the end of all rule sets, a policy must be defined. You must make sure that the default policy is always set to DROP, so you can make sure that only packets that specifically match a
rule are allowed and that everything else is dropped.
To define the rules, you’ll use the iptables command. Be aware that nothing you configure with iptables is stored automatically, so you need to store the rules that you create in a configuration file so that they are executed automatically the next time your server boots. You can, for example, put them in /etc/init.d/boot.local to ensure that they are activated at the earliest possible stage in the boot process.
Using iptables to Create a Firewall
When creating your own firewall with iptables, the first thing you need to do is to set some default policies. Do note, however, that the policy will become effective immediately, so, if you are configuring your firewall from an external connection, you will be locked out immediately. In this section, I’ll assume that you are configuring iptables from the machine itself (after all,y ou wouldn’t connect an unsecured server to the network, would you?). So start by creating some policies, entering the following commands:
iptables -P FORWARD DROP
iptables -P INPUT DROP
iptables -P OUTPUT DROP
Your server is now completely secure; in fact, it is so secure that even your graphical environment won’t come up anymore if it is installed, so don’t save this configuration and reboot your server yet. Let’s first do some additional tuning to allow for some minimal functionality.
Now that the default policy for every chain has been specified, you need to define the rules themselves. All rules must involve certain elements, and these are the matching parts, the target and the position in the chain. Basically, every iptables command uses the following generic structure:
iptables position_in_the_chain chain matching target
The next subsections describe how these are used.
An important part of every rule is the matching part, and the following list comprises the most popular elements that can be used for matching. Note that you don’t have to use all of them in a rule: if one of these elements isn’t specified, the rule is simply applied to all. For example, if you don’t specify a source IP address but you do specify a source port number, the rule applies to the source port number, coming from no matter what source IP address. The following elements can be used for matching in a rule:
Interface
Use this to specify the network interface to which the rule applies. The -o option is used to refer to an output interface, and -i is used for the input interface. It may not surprise you that -o isn’t used in the INPUT chain (because it refers to incoming packets only) and -i isn’t used in the OUTPUT chain (which refers to outgoing packets only).
Source/destination IP address
You can use -s (source) or -d (destination) to refer to an IP address. Both IP addresses for individual hosts and IP addresses for complete networks can be used. For example, use -s 192.168.0.1 to refer to one host only, or -s 192.168.0.0/16 for all hosts that have a network address starting with 192.168.
Use this to refer to protocols as defined in the file /etc/protocols. Protocol numbers as well as protocol names as used in this file can be used here. For example, -p TCP refers to all packets in which TCP is used.
Another very popular method to filter, this one is based on TCP or UDP port numbers. You can use --sport to refer to a source port or --dport to refer to a destination port. Any port number can be used, so check /etc/services for a complete list of services and their default ports if you need more details. For example, use --sport 1024:65535 if you want to refer to all ports above port 1024, or use --dport 25 to refer to the SMTP port. Note that, when using a port specification, you should always use a protocol specification as well. So don’t just use --dport 25; use -p TCP --dport 25.
Specifying the Target
After specifying the matching criterion, a second part of all rules is the so-called target: the action that has to be performed when a rule matches a packet. All rules have a target, and the following targets are available:
REJECT : The packet is rejected, and a message is sent to its sender.
DROP : The packet is discarded and no message is sent to the sender.
LOG : The packet is logged. Note that this is the only target that doesn’t stop the packet from further evaluation.
Specifying the Position in the Chain
The very first thing you need to do is to specify where exactly in the chain you need to add a rule. Imagine, for example, that you want to disallow all traffic that has destination port 80, but you do want to allow all traffic coming from IP address 1.2.3.4. If you first create the rule that specifies the destination port and then create the rule for IP address 1.2.3.4, packets from 1.2.3.4 that have destination port 80 would be rejected as well. Order does matter. When creating a rule, the following options can be used to specify
• -A: Add the rule to the end of the chain.
• -D: Delete the rule from the chain.
• -R: Replace a rule.
• -I: Insert the rule at a specific position. For example, use iptables -I INPUT 2 to place the rule on the second position in the INPUT chain.
Stateful Rules
When creating a rule to match packets that always use the same port numbers, everything is easy. Of course, this isn’t always the case. For example, a user who connects to a web server will always connect to that web server on port 80, but the packets sent back from the web server use a randomly chosen port number above 1024. You could create a rule in which outgoing packets on all ports above 1024 are opened, but that’s not ideal for security reasons.
A smart way of dealing with this problem is by using stateful packet filters. A stateful packet filter analyzes if a packet that goes out is part of an already established connection, and, if it is, it allows the answer to go out. Stateful packet filters are useful for replies that are sent by web servers and for FTP servers as well because, in the case of an FTP server, the connection is established on port 21, and, once the session is established, data is sent over port 20 to the client.
By using the --state option you can indicate what state a rule should look at. This functionality, however, is not a part of the core Netfilter modules, and an additional module has to be loaded to allow for state checking. Therefore, in every rule that wants to look at the state that a packet is in, the -m state option is used first, followed by the exact state the rule is looking at. For example, -m state --state RELATED,ESTABLISHED would look at packets that are part of related packets that are already allowed, or packets that are a part of an established session.
The state module isn’t the only module that can be used, and many other modules are available for more advanced configurations. For example, the nth module allows you to have a look at every nth packet (such as every third for example). Further discussion of modules is out of the scope of this book, so check the documentation page of the Netfilter web site at www.netfilter.org/documentation for more in-depth information.
Creating the Rules
Based on this information, you should be able to create some basic rules. Let’s assume that you have a server that has only one NIC. On this network card, you want to allow requests to the web server to come in and replies from it to go out. Also, you want to allow SSH traffic. For the rest, no other services are needed.
Like any other Netfilter configuration, you would start this configuration by creating some policies. Every chain needs its own policy. The following commands make sure that no packet comes in or out of your server by setting the policy for each chain to DROP:
iptables -P FORWARD DROP
iptables -P INPUT DROP
iptables -P OUTPUT DROP
Now that everything is blocked, you can start by allowing some packets to go in and out. First and foremost, you have to enable the loopback interface because the policies that you’ve just defined also disable all traffic on the loopback interface and that’s not good (because many services rely on the loopback interface). Without loopback interface, for example, you have no way to start the graphical environment on your machine, and many other services will fail as well. Imagine that the login process queries an LDAP server that runs on the localhost.
Now open the loopback interface using the following two rules:
iptables -A INPUT -i lo -j ACCEPT
iptables -A OUTPUT -o lo -j ACCEPT
In these two rules, the -A option is used to refer to the chain the rules have to be added to. You are using -A, and so the rule is just appended to the INPUT and the OUTPUT chains. This would make the rule the last rule that is added to the chain, just before the policy that is always the last rule in a chain that is evaluated. Next, -i lo and -o lo are used to indicate that this rule matches to everything that happens on the loopback interface. As the third and last part of these two rules, the target is specified by using the -j option (which is short for “jump to target”). In this case, the target is to accept all matching packets. So, now you have a server that allows nothing on the external network interfaces, but the loopback interface is
completely open.
Next, it’s time to do what you want to do on your server: allow incoming SSH and HTTP
traffic and allow replies to the allowed incoming traffic to be returned. Note that these two requirements consist of two parts: a part that is configured in the INPUT chain and a part that is configured in the OUTPUT chain. Let’s start with some nice rules that define the input chain:
iptables -A INPUT -m state --state ESTABLISHED,RELATED -j ACCEPT
iptables -A INPUT -p tcp --dport 22 -m state --state NEW -j ACCEPT
iptables -A INPUT -p tcp --dport 80 -m state --state NEW -j ACCEPT
iptables -A INPUT -j LOG --log-prefix "Dropped illegal incoming packet: "
The first rule in this INPUT chain tells Netfilter that all packets that are part of an already established or related session are allowed in. Next, for packets coming in on SSH port 22 that have a state NEW, the second rule indicates that they are allowed as well. Thirdly, packets that are sent to TCP destination port 80 (notice the combination between -p tcp and --dport 80 in this rule) and have a state NEW are accepted as well. The last rule finally makes sure that all packets that didn’t match any of the earlier rules are logged before they are dropped by the policy at the end of the rule. Note that logging all dropped packets as a default may cause big problems.
CAUTIONS Use logging only if you need to troubleshoot your firewall. It’s generally a bad idea to switch on logging by default, because, if not done properly, it can cause huge amounts of information to be written to your log files.
Now that you have defined the INPUT chain, let’s do the OUTPUT chain as well. No specific services have to be allowed out, with the exception of the replies to incoming packets that were allowed, and so creating the OUTPUT chain is rather simple and consists of just two rules:
iptables -A OUTPUT -m state RELATED,ESTABLISHED -j ACCEPT
iptables -A OUTPUT -j LOG --log-prefix "Dropped illegal outgoing packet: "
The use of these two rules should be clear from the explanation earlier in this section. Note that it is a good idea to turn on logging for the OUTPUT rule (unlike for the INPUT rule).
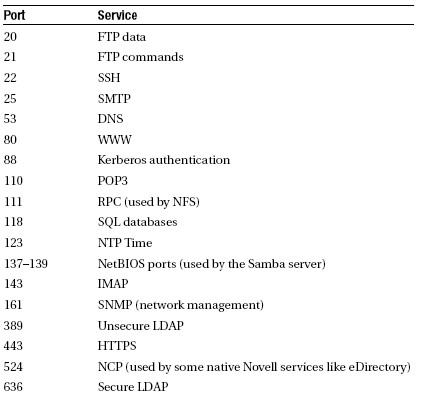
This is because, if an illegal packet should leave your server, that would indicate that some rogue service is active on your server and you would absolutely need to know about it. To make it a little easier to create your own Netfilter rules, Table 5-5 lists some of the port numbers that are commonly configured in a Netfilter firewall. For a complete list of all port numbers and the names of related services, check the contents of the /etc/services file, which lists all known services with their default ports.
Table 5-5. Frequently Used Port Numbers
Let’s stop talking about Netfilter. On a server that uses Netfilter as a kind of personal firewall, this is probably all you need to know. Notice, however, that much more can be done with iptables. But discussion of all that goes beyond the scope of this book, so check www.netfilter.org/documentation for very complete and overwhelmingly in-depth information.
Sumber : e-book Beginning Ubuntu Server Administration


0 comments: to “ Dasar dalam mensetting Netfilter Firewall dengan iptables ”
Post a Comment