IPTables and NetFilter Load Balancing using CONNMARK
Sunday, December 12, 2010
About connmark load-balancing
This article explains how to perform load balancing on a router on Linux-2.6 using netfilter and iptables with the connmark module. The purpose is to show how we can use several internet connections to provide a faster internet access to all the machines of a local network. We want all the outgoing connections to be spread across all the available links. All the routing has to be implemented on a single router machine, there is no need to change the configuration of the machines on the local network. It should work on all flavours of Linux that come with a recent linux-2.6 kernel. You will also need the iproute2 package and the basic networking tools to be installed, but that is the case with all of the major linux distributions.
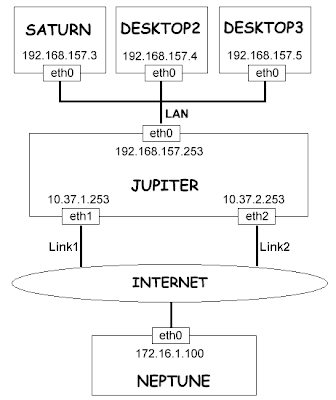
Example of networking environment
To explain how we do load-balancing using the connmark module, we will use the following network environment:
* There is local network (192.168.157.0/24) made of four desktop machines running various operating systems such as Windows and Linux. These machines are named Saturn, Desktop2, Desktop3. All the examples will be based on Saturn, and the other desktops will behave in the same way. All of these machines use Jupiter (192.168.157.253) as the default gateway. There is no advanced routing work to do on these desktops.
* The router of the network is Jupiter. It has three ethernet interfaces. The first one is eth0 (192.168.157.253), and it's connected to the local network. The other interfaces are eth1 (10.37.1.253) and eth2 (10.37.2.253). They are connected to two ethernet modems connected to two adsl links. All the interesting firewalling and routing is done on Jupiter.
* Somewhere else there is a server named Neptune connected to the internet. There is no direct link between the local network and Neptune. Neptune just acts as a normal server with no specific routing configuration. It is just used as a mere remote server in this article. For instance, it can be a web server running Apache, responding to requests made on port tcp/80. It will also work with any other service listening on any port.
* The purpose of this article is to show how we can balance the connections on Jupiter to use the whole available bandwidth provided by the two adsl links. All the connections are initiated by the desktops connected to the local network, and all connections are made to Neptune. Of course, it would work on any remote server, but we just need one machine to act as the remote server for the tests.
* In the diagram, we are using internal IP addresses (192.168.157.a, 10.37.b.c, 172.16.1.d). In a real environment all of the interfaces connected to the internet will probably have public IP addresses. They can also be private addresses in case the modems work in NAT mode. In that case each modem has two IP addresses: the private internal address on the ethernet interface, and the public IP address on the WAN interface.
* This article explains how to perform load-balancing between two links, but obviously you can do the same thing with as many links as you want.
* The tests have been made on a router running gentoo linux with a 2.6.24 kernel and iptables-1.4.0
Requirements
You will need a recent linux-2.6 kernel and a recent iptables version since we are using advanced netfilter modules that have been introduced or changed in recent linux-2.6 versions. Here are the features we will need:
* the netfilter CONNMARK target module is used to mark the packets that belong to a connection. It was introduced in linux-2.6.12.
* the netfilter statistic match module is used to decide which link to use. This feature has been merged in linux-2.6.18. Fortunately RHEL5 (Redhat Enterprise Linux 5) is based on linux-2.6.18 so this feature is available in RHEL5.
* you also need an iptables version that supports the statistic match. It is available in iptables-1.4.0, and probably in older versions as well. To know if your iptables supports it, you can either have a look at man iptables or check that there is a file named libxt_statistic.so in /lib/iptables or /lib64/iptables on your system.
* it seems that the old iptables versions support the same feature in a module named libxt_nth.so. The nth and random matches have been merged in recent iptables into a module named statistic.
How this load balancing works
Netfilter is a stateful firewall. This means that it is able to know to which connection an IP packet belongs. The connections are managed by the connection tracking module (connmark). It's important that we respect the connections when routing the packets. All the IP packets of one connection must be routed through the same link. If we route the packets of one connection through two different links, it would break the connection. This is why netfilter has a state table in memory. It uses it to remember the state of a connection, and in that way if can identify all of the packets that belong to that connection.
Everytime a new connection is created we will choose which link to use. In our example, two links can be used to route the packets on Jupiter. So we will have to choose between link1 and link2. Once the choice is made, we route the packets to either eth0 (interface connected to the link1) or eth1 (interface connected to the link2). Once the routing decision has been taken on the first IP packet of the connection, we will have to write this decision in the firewall state table so that we can do the same routing on the following packets of this connection.
We must notice that the netfilter connection tracking system is able to work on UDP packets. The UDP transport is often said to be "non connected mode" because there is no sequence number in the packets. However, the connection tracking considers that UDP packets with the same source/destination IP-addresses/ports are part of a connection. So the load balancing will be able to work on UDP traffic as well as TCP.
The load balancing works at the connection level. The routing decision (which link to use) is taken regardless of what the IP addresses or what the ports are. It means it will not take the source IP / destination IP / source port / destination port into account, so the load balancing is done for all the client computers the same way, and it works for all the services. This is important because it means that the load balancing will be efficient even when only one desktop of the local network is using the network. Jupiter will just spread all the incoming connections from the local network (eth0) to the available links (eth1 and eth2), whoever the users are.
Unfortunately, the load balancer will not be able to efficiently spread the incoming packets in the case that there is a single connection that requires a lot of bandwidth. It's just not possible to do that, because routing the packets of one connection to more than one link would break the tcp connection. The receiver would see IP packets with different source IP addresses, and it would drop the packets.
Overview of the load balancing
Now, let's see how we can do routing to balance the packets. The old route and the recent iproute2 tools all work at the IP level. The problem is the connections depend on the source and destination ports, which are decided at the transport level (TCP and UDP).
To solve that problem, we will use the netfilter connection tracking (conntrack) and connection marking (connmark) modules. They will identify which IP packets belong to which tcp/udp connection, and these modules will be used to put a mark on these packets. This mark is the fwmark attribute. In this article we may refer to this attribute using either fwmark or just mark. Keep in mind that this is the same attribute. This attribute is not part of the IP header, it's just in the router memory. In the second stage of the load balancing, the routing will use this mark to know to which ethernet device the packet must be routed. iproute2 is the package that we will use to make advanced routing. The ip rule command is used to provide policy routing, and it's able to perform IP routing based on the fwmark attribute.
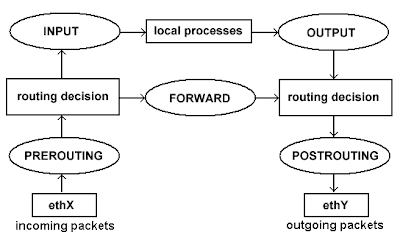
Obviously the packet must have been marked by netfilter before it reaches the routing code. That's why it's important to remember "when" netfilter works on the packets. Netfilter has five hooks in the kernel network stack. It means there are five places where the netfilter functions can work on the packets. Here are the kinds of packets that can be seen by each of the five hooks:
* PREROUTING: all the incoming packets whatever the destination address is
* POSTROUTING: all the outgoing packets whatever the source address is
* FORWARD: all the packets that are routed
* INPUT: all the packets that are sent to the local machine
* OUTPUT: all the packets sent by the local machine
So if we mark the packets at POSTROUTING, the routing code will not see the mark and the advanced routing will have no effect. That's why we must work in the PREROUTING hook for incoming routed packets, and in the OUTPUT hook if we want to route the packets sent by the router itself.
Marking the packets with connmark
About the netfilter tables
Netfilter and iptables work with three tables:
* filter: the most popular table, it's mostly used for firewalling, to accept or reject packets
* nat: it's used for Network Address Translation
* mangle: it's mostly used to modify network packets
We will work with the mangle table since we want to change an attribute of a packet (the fwmark).
The connection states
netfilter is a module that inspects packets and decides whether or not they match specific criteria. netfilter executes an action associated with a match only when the match returns true. This is how the connection tracking module gives access to the state of the connection. This is done via -m state. Here are the various states:
* NEW: the packet is initiating a new connection (it may be a SYN packet in TCP)
* ESTABLISHED: the packet is associated with a connection which has seen packets in both directions
* RELATED: the packet is starting a new connection which is associated with an existing connection (it may be a data connection if FTP)
* INVALID: the packet is not associated with a valid connection
These states are important since we must take a routing decision for new packets only, and keep the current decision for packet that are part of an existing connection.
The statistic match
The statistic netfilter module provides two modes: nth and random:
* nth: this mode allows you to know what is the index of the packet in the list of received packets. In other words, you know if it's the first, the second, the third, the fourth, ... You can use the option named every to reset the counter when it reaches a value. That way the indexes associated with the packets can be something like: 1, 2, 3, 1, 2, 3, 1, 2, 3, ... when every is 3.
* random: this mode allows you to select random packets. You can provide a probability such as 0.33 if you want to grab 33% of the packets.
In old linux/iptables versions, these two modes were implemented in two different modules. So you may need to change the iptables instructions if you are using a linux kernel prior to 2.6.18.
The connmark target
An ipfilter target is a module that runs an action. We will need both the MARK target to put a mark on a packet, and CONNMARK to manage the netfilter state table:
* -j MARK --set-mark: this action is used to write the fwmark on an IP packet. The value of the mark is given as a parameter of this action.
* -j CONNMARK --save-mark: this action is used to write the fwmark of a packet in the state table (from packet to state table)
* -j CONNMARK --restore-mark: this action is used to write the fwmark of the state table in the ip packet (from state table to packet)
Initialization of a new connection
We want to set the fwmark attribute on a packet everytime we receive a packet that initiates a new connection. To do that we will use the -m state --state NEW match and the associated actions will be to set the mark in the IP packet and to save the mark in the state table so that we can re-use it later for other packets of this connection.
The CONNMARK target provides an option named --set-mark X that is supposed to set the fwmark on a packet. It did not work during the tests, the mark was still 0. That's why we will use the following target instead: -j MARK --set-mark 1.
First, we use this match to select the packets that initiates a new connection: -m state --state NEW . Here is an example of what the conntrack module can do when it executes a match such as -m state --state NEW:
* the conntrack code sees that the current tcp packet is from 192.168.157.3:45238 to 172.16.1.100:80
* the module finds no existing tcp connection from 192.168.157.3:45238 to 172.16.1.100:80 in the netfilter state table, so it considers the state as NEW, it creates a new entry in the state table and it returns true
* netfilter sees that the match returned true, so the action associated with the match will be executed
Once a packet has been selected by the previous match, we want to use the MARK target to set the fwmark attribute in the packet, and we also want to use the CONNMARK target to save the fwmark that is associated with the new connection. We create two new chains named CONNMARK1 and CONNMARK2 (one for each link) since there are two targets associated with one match. Here is an example of what the connmark target can do when it executes a rule such as -j CONNMARK --save-mark:
* the connmark module sees that the current tcp packet is from 192.168.157.3:45238 to 172.16.1.100:80
* the module finds the state table entry that has just been created for the new connection from 192.168.157.3:45238 to 172.16.1.100:80
* it saves the fwmark attribute seen in the packet to the copy of this attribute in the state table entry
Here are the iptables instructions we use to mark the new packets:
# initialise two chains that will put the mark on the packet and keep it in memory
iptables -t mangle -N CONNMARK1
iptables -t mangle -A CONNMARK1 -j MARK --set-mark 1
iptables -t mangle -A CONNMARK1 -j CONNMARK --save-mark
iptables -t mangle -N CONNMARK2
iptables -t mangle -A CONNMARK2 -j MARK --set-mark 2
iptables -t mangle -A CONNMARK2 -j CONNMARK --save-mark
# if the mark is zero if means the packet does not belong to any existing connection
iptables -t mangle -A PREROUTING -p tcp -m state --state NEW \
-m statistic --mode nth --every 2 --packet 0 -j CONNMARK1
iptables -t mangle -A PREROUTING -p tcp -m state --state NEW \
-m statistic --mode nth --every 2 --packet 1 -j CONNMARK2
Packets of an existing connection
Now we have to work on the packets that belong to an existing connection. We have to keep the same routing decision as the one that was made for the first packet of this connection, else it would break the connection. So we first have to use the -m state --state ESTABLISHED,RELATED match to select the packets, and then we will have to find the fwmark attribute that is associated with this connection in the state table, and write this fwmark in the IP packet.
First we use the match -m state --state ESTABLISHED,RELATED to select the packets that belong to an existing connection. It's important not to mark the packets in both directions, else it would disturb the routing. The mark must only be set on packets routed from the local network (from interface eth0) to the adsl links. So we use -i eth0 to be sure we don't select the packets that go in the other direction. Here is an example of what the conntrack module does when it executes a match such as -m state --state ESTABLISHED,RELATED:
* the conntrack code sees that the current tcp packet is from 192.168.157.3:45238 to 172.16.1.100:80
* the module finds an existing tcp connection from 192.168.157.3:45238 to 172.16.1.100:80 in the netfilter state table, so the state of this packet is either ESTABLISHED or RELATED, so the match returns true
* netfilter sees that the match returned true, so the action associated with the match will be executed
here is an example of what the connmark target does when it executes an instruction such as -j CONNMARK --restore-mark:
* the connmark module sees that the current tcp packet is from 192.168.157.3:45238 to 172.16.1.100:80
* the module finds an existing tcp connection from 192.168.157.3:45238 to 172.16.1.100:80 in the netfilter state table
* it reads the fwmark attribute that has been stored in the netfilter state table and it writes it in the fwmark attribute of the packet. This attribute will be used by the routing code.
Here is the only iptable instruction we have to write to do that:
iptables -t mangle -A PREROUTING -i eth0 -p tcp \
-m state --state ESTABLISHED,RELATED -j CONNMARK --restore-mark
The whole iptables marking code
# initialise two chains that will put the mark on the packet and keep it in memory
iptables -t mangle -N CONNMARK1
iptables -t mangle -A CONNMARK1 -j MARK --set-mark 1
iptables -t mangle -A CONNMARK1 -j CONNMARK --save-mark
iptables -t mangle -N CONNMARK2
iptables -t mangle -A CONNMARK2 -j MARK --set-mark 2
iptables -t mangle -A CONNMARK2 -j CONNMARK --save-mark
# get the mark on the packet that belongs to an existing connection
iptables -t mangle -A PREROUTING -i eth0 -p tcp \
-m state --state ESTABLISHED,RELATED -j CONNMARK --restore-mark
# if the mark is zero it means that the packet does not belong to any existing connection
iptables -t mangle -A PREROUTING -p tcp -m state --state NEW \
-m statistic --mode nth --every 2 --packet 0 -j CONNMARK1
iptables -t mangle -A PREROUTING -p tcp -m state --state NEW \
-m statistic --mode nth --every 2 --packet 1 -j CONNMARK2
Routing the marked packets
To route the packets using the mark attribute, we have to use the ip rule command. It's named policy routing. We have to create secondary routing tables that will be used when the mark attribute of a packet matches a rule.
Create new routing tables
First, we have to create these two routing tables by editing /etc/iproute2/rt_tables. Here is the code that automatically creates two tables called rt_link1 and rt_link2.
if ! cat /etc/iproute2/rt_tables | grep -q '^251'
then
echo '251 rt_link1' >> /etc/iproute2/rt_tables
fi
if ! cat /etc/iproute2/rt_tables | grep -q '^252'
then
echo '252 rt_link2' >> /etc/iproute2/rt_tables
fi
Here is the list of the routing tables you should have on Jupiter:
# -----------/etc/iproute2/rt_tables------------
# reserved values
255 local
254 main
253 default
0 unspec
# custom routes
252 rt_link2
251 rt_link1
Now we must populate these two routing tables. The best thing to do is just to add one default route in each table. Each default route drives the packet to the ethernet card where the link to use is connected. That way, when a packet marked with fwmark=1 follows the default route written in rt_link1, it will be sent to Neptune through device eth1. We also use ip route flush to be sure that the table is empty.
ip route flush table rt_link1
ip route add table rt_link1 default dev eth1
ip route flush table rt_link2
ip route add table rt_link2 default dev eth2
Use the new tables with policy routing
Now we have to use the ip rule command to say what to do with the marked packets. The following lines say that the packets having the mark fwmark=1 must follow the routing instructions of the routing table named rt_link1, and the packets with the second mark must use rt_link2. At the end we flush the routing cache to be sure that the new rules are taken into account.
ip rule del from all fwmark 2 2>/dev/null
ip rule del from all fwmark 1 2>/dev/null
ip rule add fwmark 1 table rt_link1
ip rule add fwmark 2 table rt_link2
ip route flush cache
Here is the list of all rules after these commands are executed:
# ip rule show
0: from all lookup local
32764: from all fwmark 0x2 lookup rt_link2
32765: from all fwmark 0x1 lookup rt_link1
32766: from all lookup main
32767: from all lookup default
Linux network parameters
There are two network parameters that have to be checked if you want your router to behave as expected. First we want to be sure that the kernel running on Jupiter is configured to route the packets. To enable routing on IPv4 you must set ip_forward to 1 (1 means enabled, 0 means disabled).
echo 1 >| /proc/sys/net/ipv4/ip_forward
You must also disable Reverse Path Filtering. It's an option enabled by default that increases the security and prevents ip spoofing by checking that the source address of the incoming packets matches the routing table on the local machine. Since we are doing a complex setup, this option would lead to dropping our packets, so it must be disabled.
echo 0 >| /proc/sys/net/ipv4/conf/all/rp_filter
These changes will be lost if you reboot your server. You can either ensure that they are automatically executed by a script at boot time, or you can edit your network configuration files to be sure that these changes will be kept after reboot. On Gentoo and Redhat you have to edit /etc/sysctl.conf:
# /etc/sysctl.conf
#
# Enables packet forwarding
net.ipv4.ip_forward = 1
# Disable reverse path filtering
net.ipv4.conf.all.rp_filter = 0
Source Network-Address-Translation (SNAT)
Now the packets from Saturn to Neptune should be routed as expected. But there is still one problem to solve. The replies sent by Neptune to Saturn will ignore the advanced routing and will always be sent through the same link, the one that matches the route to 192.168.157.3 that is configured on Neptune. When Neptune receives packets from Saturn, the source address is 192.168.157.3. Since there is no advanced routing configured on Neptune, the packets to Saturn just follow the normal route.
This is a case of asymmetric routing. Half the packets from Saturn to Neptune are routed through the second link because of the advanced routing on Jupiter. And the replies to these packets are sent through the first link just because it's normal routing. What we have to do is to configure SNAT (Source Network-Address-Translation) on Jupiter so that all packets sent through link1 or link2 come with a rewritten source address. We want the source address of the packets from link1 to be 10.37.1.253 and the source address of the packets from link2 will be 10.37.2.253. That way Neptune will receive packets with a source address that matches the link from which they come. When Neptune replies to the requests coming from link1 or link2 it will just use the source address seen in these packets as the new destination address.
You can also notice that the SNAT involves an implicit DNAT (Destination Network-Address-Translation). When Jupiter receives a packet on eth2 (the interface where the second link is connected), it works because the destination address is 10.37.2.253. This is a reply to a packet from Saturn (192.168.157.3), so we want Jupiter to change the destination address, and to forward it to Saturn. This is done by the implicit DNAT.
It's important to notice that the Source address NAT is executed in POSTROUTING. That way it's executed after the routing, which is the place where we drive each packet to the correct device (either eth1 or eth2 on Jupiter). The SNAT iptable rule uses the "outgoing device" match to determine what source address must be written in the packet header.
In case you are using ADSL links between Jupiter and Neptune, you will be forced to use public IP addresses outside of your local network. Most modems can do NAT for you. In that case you don't have to worry about that.
Here is the code to configure SNAT on Jupiter:
iptables -t nat -F
iptables -t nat -X
iptables -t nat -A POSTROUTING -o eth1 -j SNAT --to-source 10.37.1.253
iptables -t nat -A POSTROUTING -o eth2 -j SNAT --to-source 10.37.2.253
Troubleshooting
Here is what you can do in case it does not work:
Check your firewall
In this article we assumed that the packet filtering is not enabled on your router and on your network. In case you are using iptables already, you will have to check that it's consistent with the new iptables rules involved in the destination port routing. It does not mean that you have to keep your firewall wide open to get the load balancing to work, it just means that the filtering may disturb the load balancing in the case that it's not correctly configured.
List the current connections details
The connection tracking module exports very useful information about the connections state table. You can read the file /proc/net/ip_conntrack that contains all the important attributes about the current connections, including the fwmark attribute:
% cat /proc/net/ip_conntrack
tcp 6 96 TIME_WAIT src=192.168.157.3 dst=172.16.1.100 sport=52037
dport=80 packets=6 bytes=414 src=172.16.1.100 dst=10.37.1.253
sport=80 dport=52037 packets=4 bytes=938 [ASSURED] mark=1 use=1
tcp 6 96 TIME_WAIT src=192.168.157.3 dst=172.16.1.100 sport=52035
dport=80 packets=6 bytes=414 src=172.16.1.100 dst=10.37.1.253
sport=80 dport=52035 packets=4 bytes=938 [ASSURED] mark=1 use=1
tcp 6 96 TIME_WAIT src=192.168.157.3 dst=172.16.1.100 sport=52039 dport=80
packets=6 bytes=414 src=172.16.1.100 dst=10.37.1.253 sport=80
dport=52039 packets=4 bytes=938 [ASSURED] mark=1 use=1
tcp 6 96 TIME_WAIT src=192.168.157.3 dst=172.16.1.100 sport=52036
dport=80 packets=6 bytes=414 src=172.16.1.100 dst=10.37.2.253
sport=80 dport=52036 packets=4 bytes=938 [ASSURED] mark=2 use=1
tcp 6 96 TIME_WAIT src=192.168.157.3 dst=172.16.1.100 sport=52038
dport=80 packets=6 bytes=414 src=172.16.1.100 dst=10.37.2.253
sport=80 dport=52038 packets=4 bytes=938 [ASSURED] mark=2 use=1
Logging packets with iptables
In case you have problems, you may want to enable the logging so that you can see all the packets that go through a specific netfilter instruction. To enable logging, you can replace a simple iptables action (such as CONNMARK) with a customized chain (such as LOG_FWMARK). Everytime a packet is marked you will also have a message written in your logs. For instance, you can replace this simple iptables command:
iptables -t mangle -A PREROUTING -i eth0 -p tcp \
-m state --state ESTABLISHED,RELATED -j CONNMARK --restore-mark
With the following chain:
# create a new chain to both restore the mark and log the packet
iptables -t mangle -N RESTOREMARK
iptables -t mangle -A RESTOREMARK -j CONNMARK --restore-mark
iptables -t mangle -A RESTOREMARK -j LOG --log-prefix 'restore-mark: ' --log-level info
# restore the fwmark to packet that belongs to an existing connection
iptables -t mangle -A PREROUTING -i eth0 -p tcp \
-m state --state ESTABLISHED,RELATED -j RESTOREMARK
It's important that you execute -j CONNMARK --restore-mark before -j LOG --log-prefix 'restore-mark: ' because you want to have the details of the packet attributes when it has already been changed. Unfortunately the default LOG match does not display the fwmark attribute. So it may be difficult to know whether or not the mark in the packet is what you expect. What you can do is you can edit the source code of the LOG target in the kernel sources, but it means you have to recompile it. Here is what you need to change:
root@jupiter /usr/src/linux-2.6.24.07 % diff -u net/ipv4/netfilter/ipt_LOG.000 net/ipv4/netfilter/ipt_LOG.new
--- net/ipv4/netfilter/ipt_LOG.old 2008-05-31 19:40:38.000000000 +0100
+++ net/ipv4/netfilter/ipt_LOG.new 2008-06-01 16:29:25.000000000 +0100
@@ -56,6 +56,8 @@
printk("SRC=%u.%u.%u.%u DST=%u.%u.%u.%u ",
NIPQUAD(ih->saddr), NIPQUAD(ih->daddr));
+ printk("FWMARK=%u ", (unsigned int)skb->mark);
+
/* Max length: 46 "LEN=65535 TOS=0xFF PREC=0xFF TTL=255 ID=65535 " */
printk("LEN=%u TOS=0x%02X PREC=0x%02X TTL=%u ID=%u ",
ntohs(ih->tot_len), ih->tos & IPTOS_TOS_MASK,
You can also disable logging of attributes that you consider useless since the messages are very detailed and hard to read. Here is what you can get with the patched LOG target:
iptables-mark1: IN=eth0 OUT= SRC=192.168.157.3 DST=172.16.1.100 FWMARK=1 ID=53070 SPT=44426 DPT=80
restore-mark: IN=eth0 OUT= SRC=192.168.157.3 DST=172.16.1.100 FWMARK=1 ID=53071 SPT=44426 DPT=80
restore-mark: IN=eth0 OUT= SRC=192.168.157.3 DST=172.16.1.100 FWMARK=1 ID=53072 SPT=44426 DPT=80
restore-mark: IN=eth0 OUT= SRC=192.168.157.3 DST=172.16.1.100 FWMARK=1 ID=53073 SPT=44426 DPT=80
restore-mark: IN=eth0 OUT= SRC=192.168.157.3 DST=172.16.1.100 FWMARK=1 ID=53074 SPT=44426 DPT=80
restore-mark: IN=eth0 OUT= SRC=192.168.157.3 DST=172.16.1.100 FWMARK=1 ID=53075 SPT=44426 DPT=80
Use a network sniffer
You can use a sniffer such as tcpdump (console) or wireshark (graphical mode) to check what packets are transmitted and with which attributes.
Routing configuration on Saturn
Even if 95% of the networking configuration has to be done on the router (Jupiter) don't forget to set a route to Neptune on Saturn. It may be necessary if Jupiter is not the default gateway on Saturn. Here is what to do on Saturn:
ip route add 176.16.1.100 via 192.168.157.253
Complete code of the load-balancing script
#!/bin/bash
echo 1 >| /proc/sys/net/ipv4/ip_forward
echo 0 >| /proc/sys/net/ipv4/conf/all/rp_filter
# flush all iptables entries
iptables -t filter -F
iptables -t filter -X
iptables -t nat -F
iptables -t nat -X
iptables -t mangle -F
iptables -t mangle -X
iptables -t filter -P INPUT ACCEPT
iptables -t filter -P OUTPUT ACCEPT
iptables -t filter -P FORWARD ACCEPT
# initialise chains that will do the work and log the packets
iptables -t mangle -N CONNMARK1
iptables -t mangle -A CONNMARK1 -j MARK --set-mark 1
iptables -t mangle -A CONNMARK1 -j CONNMARK --save-mark
iptables -t mangle -A CONNMARK1 -j LOG --log-prefix 'iptables-mark1: ' --log-level info
iptables -t mangle -N CONNMARK2
iptables -t mangle -A CONNMARK2 -j MARK --set-mark 2
iptables -t mangle -A CONNMARK2 -j CONNMARK --save-mark
iptables -t mangle -A CONNMARK2 -j LOG --log-prefix 'iptables-mark2: ' --log-level info
iptables -t mangle -N RESTOREMARK
iptables -t mangle -A RESTOREMARK -j CONNMARK --restore-mark
iptables -t mangle -A RESTOREMARK -j LOG --log-prefix 'restore-mark: ' --log-level info
iptables -t nat -N SNAT1
iptables -t nat -A SNAT1 -j LOG --log-prefix 'snat-to-10.37.1.253: ' --log-level info
iptables -t nat -A SNAT1 -j SNAT --to-source 10.37.1.253
iptables -t nat -N SNAT2
iptables -t nat -A SNAT2 -j LOG --log-prefix 'snat-to-10.37.2.253: ' --log-level info
iptables -t nat -A SNAT2 -j SNAT --to-source 10.37.2.253
# restore the fwmark on packets that belong to an existing connection
iptables -t mangle -A PREROUTING -i eth0 -p tcp \
-m state --state ESTABLISHED,RELATED -j RESTOREMARK
# if the mark is zero it means the packet does not belong to an existing connection
iptables -t mangle -A PREROUTING -p tcp -m state --state NEW \
-m statistic --mode nth --every 2 --packet 0 -j CONNMARK1
iptables -t mangle -A PREROUTING -p tcp -m state --state NEW \
-m statistic --mode nth --every 2 --packet 1 -j CONNMARK2
iptables -t nat -A POSTROUTING -o eth1 -j SNAT1
iptables -t nat -A POSTROUTING -o eth2 -j SNAT2
if ! cat /etc/iproute2/rt_tables | grep -q '^251'
then
echo '251 rt_link1' >> /etc/iproute2/rt_tables
fi
if ! cat /etc/iproute2/rt_tables | grep -q '^252'
then
echo '252 rt_link2' >> /etc/iproute2/rt_tables
fi
ip route flush table rt_link1 2>/dev/null
ip route add table rt_link1 default dev eth1
ip route flush table rt_link2 2>/dev/null
ip route add table rt_link2 default dev eth2
ip rule del from all fwmark 0x1 lookup rt_link1 2>/dev/null
ip rule del from all fwmark 0x2 lookup rt_link2 2>/dev/null
ip rule del from all fwmark 0x2 2>/dev/null
ip rule del from all fwmark 0x1 2>/dev/null
ip rule add fwmark 1 table rt_link1
ip rule add fwmark 2 table rt_link2
ip route flush cache
This article explains how to perform load balancing on a router on Linux-2.6 using netfilter and iptables with the connmark module. The purpose is to show how we can use several internet connections to provide a faster internet access to all the machines of a local network. We want all the outgoing connections to be spread across all the available links. All the routing has to be implemented on a single router machine, there is no need to change the configuration of the machines on the local network. It should work on all flavours of Linux that come with a recent linux-2.6 kernel. You will also need the iproute2 package and the basic networking tools to be installed, but that is the case with all of the major linux distributions.
Example of networking environment
To explain how we do load-balancing using the connmark module, we will use the following network environment:
* There is local network (192.168.157.0/24) made of four desktop machines running various operating systems such as Windows and Linux. These machines are named Saturn, Desktop2, Desktop3. All the examples will be based on Saturn, and the other desktops will behave in the same way. All of these machines use Jupiter (192.168.157.253) as the default gateway. There is no advanced routing work to do on these desktops.
* The router of the network is Jupiter. It has three ethernet interfaces. The first one is eth0 (192.168.157.253), and it's connected to the local network. The other interfaces are eth1 (10.37.1.253) and eth2 (10.37.2.253). They are connected to two ethernet modems connected to two adsl links. All the interesting firewalling and routing is done on Jupiter.
* Somewhere else there is a server named Neptune connected to the internet. There is no direct link between the local network and Neptune. Neptune just acts as a normal server with no specific routing configuration. It is just used as a mere remote server in this article. For instance, it can be a web server running Apache, responding to requests made on port tcp/80. It will also work with any other service listening on any port.
* The purpose of this article is to show how we can balance the connections on Jupiter to use the whole available bandwidth provided by the two adsl links. All the connections are initiated by the desktops connected to the local network, and all connections are made to Neptune. Of course, it would work on any remote server, but we just need one machine to act as the remote server for the tests.
* In the diagram, we are using internal IP addresses (192.168.157.a, 10.37.b.c, 172.16.1.d). In a real environment all of the interfaces connected to the internet will probably have public IP addresses. They can also be private addresses in case the modems work in NAT mode. In that case each modem has two IP addresses: the private internal address on the ethernet interface, and the public IP address on the WAN interface.
* This article explains how to perform load-balancing between two links, but obviously you can do the same thing with as many links as you want.
* The tests have been made on a router running gentoo linux with a 2.6.24 kernel and iptables-1.4.0

Requirements
You will need a recent linux-2.6 kernel and a recent iptables version since we are using advanced netfilter modules that have been introduced or changed in recent linux-2.6 versions. Here are the features we will need:
* the netfilter CONNMARK target module is used to mark the packets that belong to a connection. It was introduced in linux-2.6.12.
* the netfilter statistic match module is used to decide which link to use. This feature has been merged in linux-2.6.18. Fortunately RHEL5 (Redhat Enterprise Linux 5) is based on linux-2.6.18 so this feature is available in RHEL5.
* you also need an iptables version that supports the statistic match. It is available in iptables-1.4.0, and probably in older versions as well. To know if your iptables supports it, you can either have a look at man iptables or check that there is a file named libxt_statistic.so in /lib/iptables or /lib64/iptables on your system.
* it seems that the old iptables versions support the same feature in a module named libxt_nth.so. The nth and random matches have been merged in recent iptables into a module named statistic.
How this load balancing works
Netfilter is a stateful firewall. This means that it is able to know to which connection an IP packet belongs. The connections are managed by the connection tracking module (connmark). It's important that we respect the connections when routing the packets. All the IP packets of one connection must be routed through the same link. If we route the packets of one connection through two different links, it would break the connection. This is why netfilter has a state table in memory. It uses it to remember the state of a connection, and in that way if can identify all of the packets that belong to that connection.
Everytime a new connection is created we will choose which link to use. In our example, two links can be used to route the packets on Jupiter. So we will have to choose between link1 and link2. Once the choice is made, we route the packets to either eth0 (interface connected to the link1) or eth1 (interface connected to the link2). Once the routing decision has been taken on the first IP packet of the connection, we will have to write this decision in the firewall state table so that we can do the same routing on the following packets of this connection.
We must notice that the netfilter connection tracking system is able to work on UDP packets. The UDP transport is often said to be "non connected mode" because there is no sequence number in the packets. However, the connection tracking considers that UDP packets with the same source/destination IP-addresses/ports are part of a connection. So the load balancing will be able to work on UDP traffic as well as TCP.
The load balancing works at the connection level. The routing decision (which link to use) is taken regardless of what the IP addresses or what the ports are. It means it will not take the source IP / destination IP / source port / destination port into account, so the load balancing is done for all the client computers the same way, and it works for all the services. This is important because it means that the load balancing will be efficient even when only one desktop of the local network is using the network. Jupiter will just spread all the incoming connections from the local network (eth0) to the available links (eth1 and eth2), whoever the users are.
Unfortunately, the load balancer will not be able to efficiently spread the incoming packets in the case that there is a single connection that requires a lot of bandwidth. It's just not possible to do that, because routing the packets of one connection to more than one link would break the tcp connection. The receiver would see IP packets with different source IP addresses, and it would drop the packets.
Overview of the load balancing
Now, let's see how we can do routing to balance the packets. The old route and the recent iproute2 tools all work at the IP level. The problem is the connections depend on the source and destination ports, which are decided at the transport level (TCP and UDP).
To solve that problem, we will use the netfilter connection tracking (conntrack) and connection marking (connmark) modules. They will identify which IP packets belong to which tcp/udp connection, and these modules will be used to put a mark on these packets. This mark is the fwmark attribute. In this article we may refer to this attribute using either fwmark or just mark. Keep in mind that this is the same attribute. This attribute is not part of the IP header, it's just in the router memory. In the second stage of the load balancing, the routing will use this mark to know to which ethernet device the packet must be routed. iproute2 is the package that we will use to make advanced routing. The ip rule command is used to provide policy routing, and it's able to perform IP routing based on the fwmark attribute.
Obviously the packet must have been marked by netfilter before it reaches the routing code. That's why it's important to remember "when" netfilter works on the packets. Netfilter has five hooks in the kernel network stack. It means there are five places where the netfilter functions can work on the packets. Here are the kinds of packets that can be seen by each of the five hooks:
* PREROUTING: all the incoming packets whatever the destination address is
* POSTROUTING: all the outgoing packets whatever the source address is
* FORWARD: all the packets that are routed
* INPUT: all the packets that are sent to the local machine
* OUTPUT: all the packets sent by the local machine
So if we mark the packets at POSTROUTING, the routing code will not see the mark and the advanced routing will have no effect. That's why we must work in the PREROUTING hook for incoming routed packets, and in the OUTPUT hook if we want to route the packets sent by the router itself.

Marking the packets with connmark
About the netfilter tables
Netfilter and iptables work with three tables:
* filter: the most popular table, it's mostly used for firewalling, to accept or reject packets
* nat: it's used for Network Address Translation
* mangle: it's mostly used to modify network packets
We will work with the mangle table since we want to change an attribute of a packet (the fwmark).
The connection states
netfilter is a module that inspects packets and decides whether or not they match specific criteria. netfilter executes an action associated with a match only when the match returns true. This is how the connection tracking module gives access to the state of the connection. This is done via -m state. Here are the various states:
* NEW: the packet is initiating a new connection (it may be a SYN packet in TCP)
* ESTABLISHED: the packet is associated with a connection which has seen packets in both directions
* RELATED: the packet is starting a new connection which is associated with an existing connection (it may be a data connection if FTP)
* INVALID: the packet is not associated with a valid connection
These states are important since we must take a routing decision for new packets only, and keep the current decision for packet that are part of an existing connection.
The statistic match
The statistic netfilter module provides two modes: nth and random:
* nth: this mode allows you to know what is the index of the packet in the list of received packets. In other words, you know if it's the first, the second, the third, the fourth, ... You can use the option named every to reset the counter when it reaches a value. That way the indexes associated with the packets can be something like: 1, 2, 3, 1, 2, 3, 1, 2, 3, ... when every is 3.
* random: this mode allows you to select random packets. You can provide a probability such as 0.33 if you want to grab 33% of the packets.
In old linux/iptables versions, these two modes were implemented in two different modules. So you may need to change the iptables instructions if you are using a linux kernel prior to 2.6.18.
The connmark target
An ipfilter target is a module that runs an action. We will need both the MARK target to put a mark on a packet, and CONNMARK to manage the netfilter state table:
* -j MARK --set-mark: this action is used to write the fwmark on an IP packet. The value of the mark is given as a parameter of this action.
* -j CONNMARK --save-mark: this action is used to write the fwmark of a packet in the state table (from packet to state table)
* -j CONNMARK --restore-mark: this action is used to write the fwmark of the state table in the ip packet (from state table to packet)
Initialization of a new connection
We want to set the fwmark attribute on a packet everytime we receive a packet that initiates a new connection. To do that we will use the -m state --state NEW match and the associated actions will be to set the mark in the IP packet and to save the mark in the state table so that we can re-use it later for other packets of this connection.
The CONNMARK target provides an option named --set-mark X that is supposed to set the fwmark on a packet. It did not work during the tests, the mark was still 0. That's why we will use the following target instead: -j MARK --set-mark 1.
First, we use this match to select the packets that initiates a new connection: -m state --state NEW . Here is an example of what the conntrack module can do when it executes a match such as -m state --state NEW:
* the conntrack code sees that the current tcp packet is from 192.168.157.3:45238 to 172.16.1.100:80
* the module finds no existing tcp connection from 192.168.157.3:45238 to 172.16.1.100:80 in the netfilter state table, so it considers the state as NEW, it creates a new entry in the state table and it returns true
* netfilter sees that the match returned true, so the action associated with the match will be executed
Once a packet has been selected by the previous match, we want to use the MARK target to set the fwmark attribute in the packet, and we also want to use the CONNMARK target to save the fwmark that is associated with the new connection. We create two new chains named CONNMARK1 and CONNMARK2 (one for each link) since there are two targets associated with one match. Here is an example of what the connmark target can do when it executes a rule such as -j CONNMARK --save-mark:
* the connmark module sees that the current tcp packet is from 192.168.157.3:45238 to 172.16.1.100:80
* the module finds the state table entry that has just been created for the new connection from 192.168.157.3:45238 to 172.16.1.100:80
* it saves the fwmark attribute seen in the packet to the copy of this attribute in the state table entry
Here are the iptables instructions we use to mark the new packets:
# initialise two chains that will put the mark on the packet and keep it in memory
iptables -t mangle -N CONNMARK1
iptables -t mangle -A CONNMARK1 -j MARK --set-mark 1
iptables -t mangle -A CONNMARK1 -j CONNMARK --save-mark
iptables -t mangle -N CONNMARK2
iptables -t mangle -A CONNMARK2 -j MARK --set-mark 2
iptables -t mangle -A CONNMARK2 -j CONNMARK --save-mark
# if the mark is zero if means the packet does not belong to any existing connection
iptables -t mangle -A PREROUTING -p tcp -m state --state NEW \
-m statistic --mode nth --every 2 --packet 0 -j CONNMARK1
iptables -t mangle -A PREROUTING -p tcp -m state --state NEW \
-m statistic --mode nth --every 2 --packet 1 -j CONNMARK2
Packets of an existing connection
Now we have to work on the packets that belong to an existing connection. We have to keep the same routing decision as the one that was made for the first packet of this connection, else it would break the connection. So we first have to use the -m state --state ESTABLISHED,RELATED match to select the packets, and then we will have to find the fwmark attribute that is associated with this connection in the state table, and write this fwmark in the IP packet.
First we use the match -m state --state ESTABLISHED,RELATED to select the packets that belong to an existing connection. It's important not to mark the packets in both directions, else it would disturb the routing. The mark must only be set on packets routed from the local network (from interface eth0) to the adsl links. So we use -i eth0 to be sure we don't select the packets that go in the other direction. Here is an example of what the conntrack module does when it executes a match such as -m state --state ESTABLISHED,RELATED:
* the conntrack code sees that the current tcp packet is from 192.168.157.3:45238 to 172.16.1.100:80
* the module finds an existing tcp connection from 192.168.157.3:45238 to 172.16.1.100:80 in the netfilter state table, so the state of this packet is either ESTABLISHED or RELATED, so the match returns true
* netfilter sees that the match returned true, so the action associated with the match will be executed
here is an example of what the connmark target does when it executes an instruction such as -j CONNMARK --restore-mark:
* the connmark module sees that the current tcp packet is from 192.168.157.3:45238 to 172.16.1.100:80
* the module finds an existing tcp connection from 192.168.157.3:45238 to 172.16.1.100:80 in the netfilter state table
* it reads the fwmark attribute that has been stored in the netfilter state table and it writes it in the fwmark attribute of the packet. This attribute will be used by the routing code.
Here is the only iptable instruction we have to write to do that:
iptables -t mangle -A PREROUTING -i eth0 -p tcp \
-m state --state ESTABLISHED,RELATED -j CONNMARK --restore-mark
The whole iptables marking code
# initialise two chains that will put the mark on the packet and keep it in memory
iptables -t mangle -N CONNMARK1
iptables -t mangle -A CONNMARK1 -j MARK --set-mark 1
iptables -t mangle -A CONNMARK1 -j CONNMARK --save-mark
iptables -t mangle -N CONNMARK2
iptables -t mangle -A CONNMARK2 -j MARK --set-mark 2
iptables -t mangle -A CONNMARK2 -j CONNMARK --save-mark
# get the mark on the packet that belongs to an existing connection
iptables -t mangle -A PREROUTING -i eth0 -p tcp \
-m state --state ESTABLISHED,RELATED -j CONNMARK --restore-mark
# if the mark is zero it means that the packet does not belong to any existing connection
iptables -t mangle -A PREROUTING -p tcp -m state --state NEW \
-m statistic --mode nth --every 2 --packet 0 -j CONNMARK1
iptables -t mangle -A PREROUTING -p tcp -m state --state NEW \
-m statistic --mode nth --every 2 --packet 1 -j CONNMARK2
Routing the marked packets
To route the packets using the mark attribute, we have to use the ip rule command. It's named policy routing. We have to create secondary routing tables that will be used when the mark attribute of a packet matches a rule.
Create new routing tables
First, we have to create these two routing tables by editing /etc/iproute2/rt_tables. Here is the code that automatically creates two tables called rt_link1 and rt_link2.
if ! cat /etc/iproute2/rt_tables | grep -q '^251'
then
echo '251 rt_link1' >> /etc/iproute2/rt_tables
fi
if ! cat /etc/iproute2/rt_tables | grep -q '^252'
then
echo '252 rt_link2' >> /etc/iproute2/rt_tables
fi
Here is the list of the routing tables you should have on Jupiter:
# -----------/etc/iproute2/rt_tables------------
# reserved values
255 local
254 main
253 default
0 unspec
# custom routes
252 rt_link2
251 rt_link1
Now we must populate these two routing tables. The best thing to do is just to add one default route in each table. Each default route drives the packet to the ethernet card where the link to use is connected. That way, when a packet marked with fwmark=1 follows the default route written in rt_link1, it will be sent to Neptune through device eth1. We also use ip route flush to be sure that the table is empty.
ip route flush table rt_link1
ip route add table rt_link1 default dev eth1
ip route flush table rt_link2
ip route add table rt_link2 default dev eth2
Use the new tables with policy routing
Now we have to use the ip rule command to say what to do with the marked packets. The following lines say that the packets having the mark fwmark=1 must follow the routing instructions of the routing table named rt_link1, and the packets with the second mark must use rt_link2. At the end we flush the routing cache to be sure that the new rules are taken into account.
ip rule del from all fwmark 2 2>/dev/null
ip rule del from all fwmark 1 2>/dev/null
ip rule add fwmark 1 table rt_link1
ip rule add fwmark 2 table rt_link2
ip route flush cache
Here is the list of all rules after these commands are executed:
# ip rule show
0: from all lookup local
32764: from all fwmark 0x2 lookup rt_link2
32765: from all fwmark 0x1 lookup rt_link1
32766: from all lookup main
32767: from all lookup default
Linux network parameters
There are two network parameters that have to be checked if you want your router to behave as expected. First we want to be sure that the kernel running on Jupiter is configured to route the packets. To enable routing on IPv4 you must set ip_forward to 1 (1 means enabled, 0 means disabled).
echo 1 >| /proc/sys/net/ipv4/ip_forward
You must also disable Reverse Path Filtering. It's an option enabled by default that increases the security and prevents ip spoofing by checking that the source address of the incoming packets matches the routing table on the local machine. Since we are doing a complex setup, this option would lead to dropping our packets, so it must be disabled.
echo 0 >| /proc/sys/net/ipv4/conf/all/rp_filter
These changes will be lost if you reboot your server. You can either ensure that they are automatically executed by a script at boot time, or you can edit your network configuration files to be sure that these changes will be kept after reboot. On Gentoo and Redhat you have to edit /etc/sysctl.conf:
# /etc/sysctl.conf
#
# Enables packet forwarding
net.ipv4.ip_forward = 1
# Disable reverse path filtering
net.ipv4.conf.all.rp_filter = 0
Source Network-Address-Translation (SNAT)
Now the packets from Saturn to Neptune should be routed as expected. But there is still one problem to solve. The replies sent by Neptune to Saturn will ignore the advanced routing and will always be sent through the same link, the one that matches the route to 192.168.157.3 that is configured on Neptune. When Neptune receives packets from Saturn, the source address is 192.168.157.3. Since there is no advanced routing configured on Neptune, the packets to Saturn just follow the normal route.
This is a case of asymmetric routing. Half the packets from Saturn to Neptune are routed through the second link because of the advanced routing on Jupiter. And the replies to these packets are sent through the first link just because it's normal routing. What we have to do is to configure SNAT (Source Network-Address-Translation) on Jupiter so that all packets sent through link1 or link2 come with a rewritten source address. We want the source address of the packets from link1 to be 10.37.1.253 and the source address of the packets from link2 will be 10.37.2.253. That way Neptune will receive packets with a source address that matches the link from which they come. When Neptune replies to the requests coming from link1 or link2 it will just use the source address seen in these packets as the new destination address.
You can also notice that the SNAT involves an implicit DNAT (Destination Network-Address-Translation). When Jupiter receives a packet on eth2 (the interface where the second link is connected), it works because the destination address is 10.37.2.253. This is a reply to a packet from Saturn (192.168.157.3), so we want Jupiter to change the destination address, and to forward it to Saturn. This is done by the implicit DNAT.
It's important to notice that the Source address NAT is executed in POSTROUTING. That way it's executed after the routing, which is the place where we drive each packet to the correct device (either eth1 or eth2 on Jupiter). The SNAT iptable rule uses the "outgoing device" match to determine what source address must be written in the packet header.
In case you are using ADSL links between Jupiter and Neptune, you will be forced to use public IP addresses outside of your local network. Most modems can do NAT for you. In that case you don't have to worry about that.
Here is the code to configure SNAT on Jupiter:
iptables -t nat -F
iptables -t nat -X
iptables -t nat -A POSTROUTING -o eth1 -j SNAT --to-source 10.37.1.253
iptables -t nat -A POSTROUTING -o eth2 -j SNAT --to-source 10.37.2.253
Troubleshooting
Here is what you can do in case it does not work:
Check your firewall
In this article we assumed that the packet filtering is not enabled on your router and on your network. In case you are using iptables already, you will have to check that it's consistent with the new iptables rules involved in the destination port routing. It does not mean that you have to keep your firewall wide open to get the load balancing to work, it just means that the filtering may disturb the load balancing in the case that it's not correctly configured.
List the current connections details
The connection tracking module exports very useful information about the connections state table. You can read the file /proc/net/ip_conntrack that contains all the important attributes about the current connections, including the fwmark attribute:
% cat /proc/net/ip_conntrack
tcp 6 96 TIME_WAIT src=192.168.157.3 dst=172.16.1.100 sport=52037
dport=80 packets=6 bytes=414 src=172.16.1.100 dst=10.37.1.253
sport=80 dport=52037 packets=4 bytes=938 [ASSURED] mark=1 use=1
tcp 6 96 TIME_WAIT src=192.168.157.3 dst=172.16.1.100 sport=52035
dport=80 packets=6 bytes=414 src=172.16.1.100 dst=10.37.1.253
sport=80 dport=52035 packets=4 bytes=938 [ASSURED] mark=1 use=1
tcp 6 96 TIME_WAIT src=192.168.157.3 dst=172.16.1.100 sport=52039 dport=80
packets=6 bytes=414 src=172.16.1.100 dst=10.37.1.253 sport=80
dport=52039 packets=4 bytes=938 [ASSURED] mark=1 use=1
tcp 6 96 TIME_WAIT src=192.168.157.3 dst=172.16.1.100 sport=52036
dport=80 packets=6 bytes=414 src=172.16.1.100 dst=10.37.2.253
sport=80 dport=52036 packets=4 bytes=938 [ASSURED] mark=2 use=1
tcp 6 96 TIME_WAIT src=192.168.157.3 dst=172.16.1.100 sport=52038
dport=80 packets=6 bytes=414 src=172.16.1.100 dst=10.37.2.253
sport=80 dport=52038 packets=4 bytes=938 [ASSURED] mark=2 use=1
Logging packets with iptables
In case you have problems, you may want to enable the logging so that you can see all the packets that go through a specific netfilter instruction. To enable logging, you can replace a simple iptables action (such as CONNMARK) with a customized chain (such as LOG_FWMARK). Everytime a packet is marked you will also have a message written in your logs. For instance, you can replace this simple iptables command:
iptables -t mangle -A PREROUTING -i eth0 -p tcp \
-m state --state ESTABLISHED,RELATED -j CONNMARK --restore-mark
With the following chain:
# create a new chain to both restore the mark and log the packet
iptables -t mangle -N RESTOREMARK
iptables -t mangle -A RESTOREMARK -j CONNMARK --restore-mark
iptables -t mangle -A RESTOREMARK -j LOG --log-prefix 'restore-mark: ' --log-level info
# restore the fwmark to packet that belongs to an existing connection
iptables -t mangle -A PREROUTING -i eth0 -p tcp \
-m state --state ESTABLISHED,RELATED -j RESTOREMARK
It's important that you execute -j CONNMARK --restore-mark before -j LOG --log-prefix 'restore-mark: ' because you want to have the details of the packet attributes when it has already been changed. Unfortunately the default LOG match does not display the fwmark attribute. So it may be difficult to know whether or not the mark in the packet is what you expect. What you can do is you can edit the source code of the LOG target in the kernel sources, but it means you have to recompile it. Here is what you need to change:
root@jupiter /usr/src/linux-2.6.24.07 % diff -u net/ipv4/netfilter/ipt_LOG.000 net/ipv4/netfilter/ipt_LOG.new
--- net/ipv4/netfilter/ipt_LOG.old 2008-05-31 19:40:38.000000000 +0100
+++ net/ipv4/netfilter/ipt_LOG.new 2008-06-01 16:29:25.000000000 +0100
@@ -56,6 +56,8 @@
printk("SRC=%u.%u.%u.%u DST=%u.%u.%u.%u ",
NIPQUAD(ih->saddr), NIPQUAD(ih->daddr));
+ printk("FWMARK=%u ", (unsigned int)skb->mark);
+
/* Max length: 46 "LEN=65535 TOS=0xFF PREC=0xFF TTL=255 ID=65535 " */
printk("LEN=%u TOS=0x%02X PREC=0x%02X TTL=%u ID=%u ",
ntohs(ih->tot_len), ih->tos & IPTOS_TOS_MASK,
You can also disable logging of attributes that you consider useless since the messages are very detailed and hard to read. Here is what you can get with the patched LOG target:
iptables-mark1: IN=eth0 OUT= SRC=192.168.157.3 DST=172.16.1.100 FWMARK=1 ID=53070 SPT=44426 DPT=80
restore-mark: IN=eth0 OUT= SRC=192.168.157.3 DST=172.16.1.100 FWMARK=1 ID=53071 SPT=44426 DPT=80
restore-mark: IN=eth0 OUT= SRC=192.168.157.3 DST=172.16.1.100 FWMARK=1 ID=53072 SPT=44426 DPT=80
restore-mark: IN=eth0 OUT= SRC=192.168.157.3 DST=172.16.1.100 FWMARK=1 ID=53073 SPT=44426 DPT=80
restore-mark: IN=eth0 OUT= SRC=192.168.157.3 DST=172.16.1.100 FWMARK=1 ID=53074 SPT=44426 DPT=80
restore-mark: IN=eth0 OUT= SRC=192.168.157.3 DST=172.16.1.100 FWMARK=1 ID=53075 SPT=44426 DPT=80
Use a network sniffer
You can use a sniffer such as tcpdump (console) or wireshark (graphical mode) to check what packets are transmitted and with which attributes.
Routing configuration on Saturn
Even if 95% of the networking configuration has to be done on the router (Jupiter) don't forget to set a route to Neptune on Saturn. It may be necessary if Jupiter is not the default gateway on Saturn. Here is what to do on Saturn:
ip route add 176.16.1.100 via 192.168.157.253
Complete code of the load-balancing script
#!/bin/bash
echo 1 >| /proc/sys/net/ipv4/ip_forward
echo 0 >| /proc/sys/net/ipv4/conf/all/rp_filter
# flush all iptables entries
iptables -t filter -F
iptables -t filter -X
iptables -t nat -F
iptables -t nat -X
iptables -t mangle -F
iptables -t mangle -X
iptables -t filter -P INPUT ACCEPT
iptables -t filter -P OUTPUT ACCEPT
iptables -t filter -P FORWARD ACCEPT
# initialise chains that will do the work and log the packets
iptables -t mangle -N CONNMARK1
iptables -t mangle -A CONNMARK1 -j MARK --set-mark 1
iptables -t mangle -A CONNMARK1 -j CONNMARK --save-mark
iptables -t mangle -A CONNMARK1 -j LOG --log-prefix 'iptables-mark1: ' --log-level info
iptables -t mangle -N CONNMARK2
iptables -t mangle -A CONNMARK2 -j MARK --set-mark 2
iptables -t mangle -A CONNMARK2 -j CONNMARK --save-mark
iptables -t mangle -A CONNMARK2 -j LOG --log-prefix 'iptables-mark2: ' --log-level info
iptables -t mangle -N RESTOREMARK
iptables -t mangle -A RESTOREMARK -j CONNMARK --restore-mark
iptables -t mangle -A RESTOREMARK -j LOG --log-prefix 'restore-mark: ' --log-level info
iptables -t nat -N SNAT1
iptables -t nat -A SNAT1 -j LOG --log-prefix 'snat-to-10.37.1.253: ' --log-level info
iptables -t nat -A SNAT1 -j SNAT --to-source 10.37.1.253
iptables -t nat -N SNAT2
iptables -t nat -A SNAT2 -j LOG --log-prefix 'snat-to-10.37.2.253: ' --log-level info
iptables -t nat -A SNAT2 -j SNAT --to-source 10.37.2.253
# restore the fwmark on packets that belong to an existing connection
iptables -t mangle -A PREROUTING -i eth0 -p tcp \
-m state --state ESTABLISHED,RELATED -j RESTOREMARK
# if the mark is zero it means the packet does not belong to an existing connection
iptables -t mangle -A PREROUTING -p tcp -m state --state NEW \
-m statistic --mode nth --every 2 --packet 0 -j CONNMARK1
iptables -t mangle -A PREROUTING -p tcp -m state --state NEW \
-m statistic --mode nth --every 2 --packet 1 -j CONNMARK2
iptables -t nat -A POSTROUTING -o eth1 -j SNAT1
iptables -t nat -A POSTROUTING -o eth2 -j SNAT2
if ! cat /etc/iproute2/rt_tables | grep -q '^251'
then
echo '251 rt_link1' >> /etc/iproute2/rt_tables
fi
if ! cat /etc/iproute2/rt_tables | grep -q '^252'
then
echo '252 rt_link2' >> /etc/iproute2/rt_tables
fi
ip route flush table rt_link1 2>/dev/null
ip route add table rt_link1 default dev eth1
ip route flush table rt_link2 2>/dev/null
ip route add table rt_link2 default dev eth2
ip rule del from all fwmark 0x1 lookup rt_link1 2>/dev/null
ip rule del from all fwmark 0x2 lookup rt_link2 2>/dev/null
ip rule del from all fwmark 0x2 2>/dev/null
ip rule del from all fwmark 0x1 2>/dev/null
ip rule add fwmark 1 table rt_link1
ip rule add fwmark 2 table rt_link2
ip route flush cache


0 comments: to “ IPTables and NetFilter Load Balancing using CONNMARK ”
Post a Comment